Sony HXR-MC1 Operating Guide / Read This First - Page 41
Printing recorded images (PictBridge compliant printer), PictBridge compliant, printer - footage
 |
View all Sony HXR-MC1 manuals
Add to My Manuals
Save this manual to your list of manuals |
Page 41 highlights
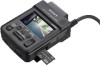
Editing 3 Touch [ USB CONNECT]. 4 Operate the device to be connected, and start recording. For details, refer to the instruction manuals supplied with the device to be connected. 5 After dubbing is complete, touch [END] t [YES], then disconnect the USB cable. Attention This camcorder captures high definition footage in the AVCHD format. Using the enclosed PC software, high definition footage can be copied onto DVD media. However, DVD media containing AVCHD footage should not be used with DVD based players or recorders, as the DVD player/ recorder may fail to eject the media and may erase its contents without warning. DVD media containing AVCHD footage may be played on a compatible Blu-ray Disc™ player/recorder or other compatible device. z Tips • If the [USB SELECT] screen does not appear, touch (HOME) t (OTHERS) t [USB CONNECT]. Printing recorded images (PictBridge compliant printer) You can print out still images using a PictBridge compliant printer, without connecting the camcorder to a computer. Connect your camcorder to the AC Adaptor to obtain power from the wall outlet (wall socket) (p. 9). Turn on the printer. Insert the "Memory Stick PRO Duo" media containing the still images you want to print into your camcorder. 1 Turn on your camcorder. 2 Connect the (USB) jack to the printer using the USB cable (p. 86). [USB SELECT] appears on the screen automatically. 3 Touch [PRINT]. When connection is complete, (PictBridge connecting) appears on the screen. You can select a still image on the screen. 41
-
 1
1 -
2
-
3
-
4
-
5
-
6
-
7
-
8
-
9
-
10
-
11
-
12
-
13
-
14
-
15
-
16
-
17
-
18
-
19
-
20
-
21
-
22
-
23
-
24
-
25
-
26
-
27
-
28
-
29
-
30
-
31
-
32
-
33
-
34
-
35
-
 36
36 -
 37
37 -
 38
38 -
 39
39 -
 40
40 -
 41
41 -
 42
42 -
 43
43 -
 44
44 -
 45
45 -
 46
46 -
47
-
48
-
49
-
50
-
51
-
52
-
53
-
54
-
55
-
56
-
57
-
58
-
59
-
60
-
61
-
62
-
63
-
64
-
65
-
66
-
67
-
68
-
69
-
70
-
71
-
72
-
73
-
74
-
75
-
76
-
77
-
78
-
79
-
80
-
81
-
82
-
83
-
84
-
85
-
86
-
87
-
88
-
89
-
90
-
91
-
92
-
93
-
94
-
95
-
96
 |
 |
