Sony ICD-BP120 Primary User Manual - Page 8
Getting Started, Step 1: Installing the Batteries
 |
View all Sony ICD-BP120 manuals
Add to My Manuals
Save this manual to your list of manuals |
Page 8 highlights
BGetting Started Step 1: Installing the Batteries 1 Slide and lift the battery compartment lid. 2 1 2 Insert two LR03 (size AAA) alkaline batteries with correct polarity, and close the lid. 2 1 If the battery compartment lid is accidentally detached, attach it as illustrated. Clock setting display appears when you insert batteries for the first time, or when you insert batteries after the unit has been without batteries for a certain period of time. Please refer to Steps 2 to 4 in "Step 2: Setting the Clock" on pages 10 and 11 to set the date and time. 8
-
 1
1 -
2
-
 3
3 -
 4
4 -
 5
5 -
 6
6 -
 7
7 -
 8
8 -
 9
9 -
 10
10 -
 11
11 -
 12
12 -
 13
13 -
14
-
15
-
16
-
17
-
18
-
19
-
20
-
21
-
22
-
23
-
24
-
25
-
26
-
27
-
28
-
29
-
30
-
31
-
32
-
33
-
34
-
35
-
36
-
37
-
38
-
39
-
40
-
41
-
42
-
43
-
44
-
45
-
46
-
47
-
48
-
49
-
50
-
51
-
52
-
53
-
54
-
55
-
56
-
57
-
58
-
59
-
60
-
61
-
62
-
63
-
64
-
65
-
66
-
67
-
68
 |
 |

8
B
Getting Started
Step 1: Installing the Batteries
1
Slide and lift the battery compartment lid.
2
Insert two LR03 (size AAA) alkaline batteries with correct
polarity, and close the lid.
If the battery compartment lid is
accidentally detached,
attach it
as illustrated.
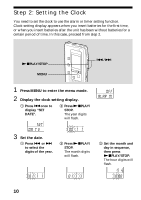
Clock setting display appears when you insert batteries for the first time,
or when you insert batteries after the unit has been without batteries for a
certain period of time. Please refer to Steps 2 to 4 in “Step 2: Setting the
Clock” on pages 10 and 11 to set the date and time.
2
1
1
2