Sony ILCA-68K Instruction Manual - Page 28
Setting the date and time
 |
View all Sony ILCA-68K manuals
Add to My Manuals
Save this manual to your list of manuals |
Page 28 highlights
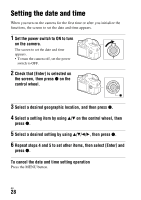
Setting the date and time When you turn on the camera for the first time or after you initialize the functions, the screen to set the date and time appears. 1 Set the power switch to ON to turn on the camera. The screen to set the date and time appears. • To turn the camera off, set the power switch to OFF. 2 Check that [Enter] is selected on the screen, then press z on the control wheel. 3 Select a desired geographic location, and then press z. 4 Select a setting item by using v/V on the control wheel, then press z. 5 Select a desired setting by using v/V/b/B, then press z. 6 Repeat steps 4 and 5 to set other items, then select [Enter] and press z. To cancel the date and time setting operation Press the MENU button. GB 28
-
 1
1 -
2
-
3
-
4
-
5
-
6
-
7
-
8
-
9
-
10
-
11
-
12
-
13
-
14
-
15
-
16
-
17
-
18
-
19
-
20
-
21
-
22
-
 23
23 -
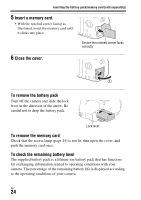 24
24 -
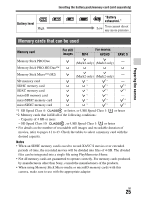 25
25 -
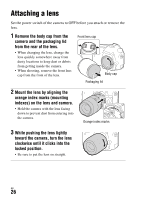 26
26 -
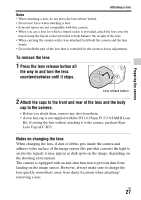 27
27 -
 28
28 -
 29
29 -
 30
30 -
 31
31 -
 32
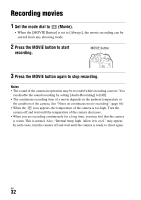
32 -
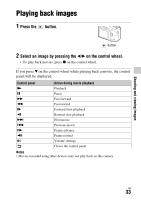 33
33 -
34
-
35
-
36
-
37
-
38
-
39
-
40
-
41
-
42
-
43
-
44
-
45
-
46
-
47
-
48
-
49
-
50
-
51
-
52
-
53
-
54
-
55
-
56
 |
 |

GB
28
Setting the date and time
When you turn on the camera for the first time or after you initialize the
functions, the screen to set the date and time appears.
To cancel the date and time setting operation
Press the MENU button.
1
Set the power switch to ON to turn
on the camera.
The screen to set the date and time
appears.
•
To turn the camera off, set the power
switch to OFF.
2
Check that [Enter] is selected on
the screen, then press
z
on the
control wheel.
3
Select a desired geographic location, and then press
z
.
4
Select a setting item by using
v
/
V
on the control wheel, then
press
z
.
5
Select a desired setting by using
v
/
V
/
b
/
B
, then press
z
.
6
Repeat steps 4 and 5 to set other items, then select [Enter] and
press
z
.