Sony KDL-42XBR950 Operating Instructions (Large File - 14.6 MB) - Page 22
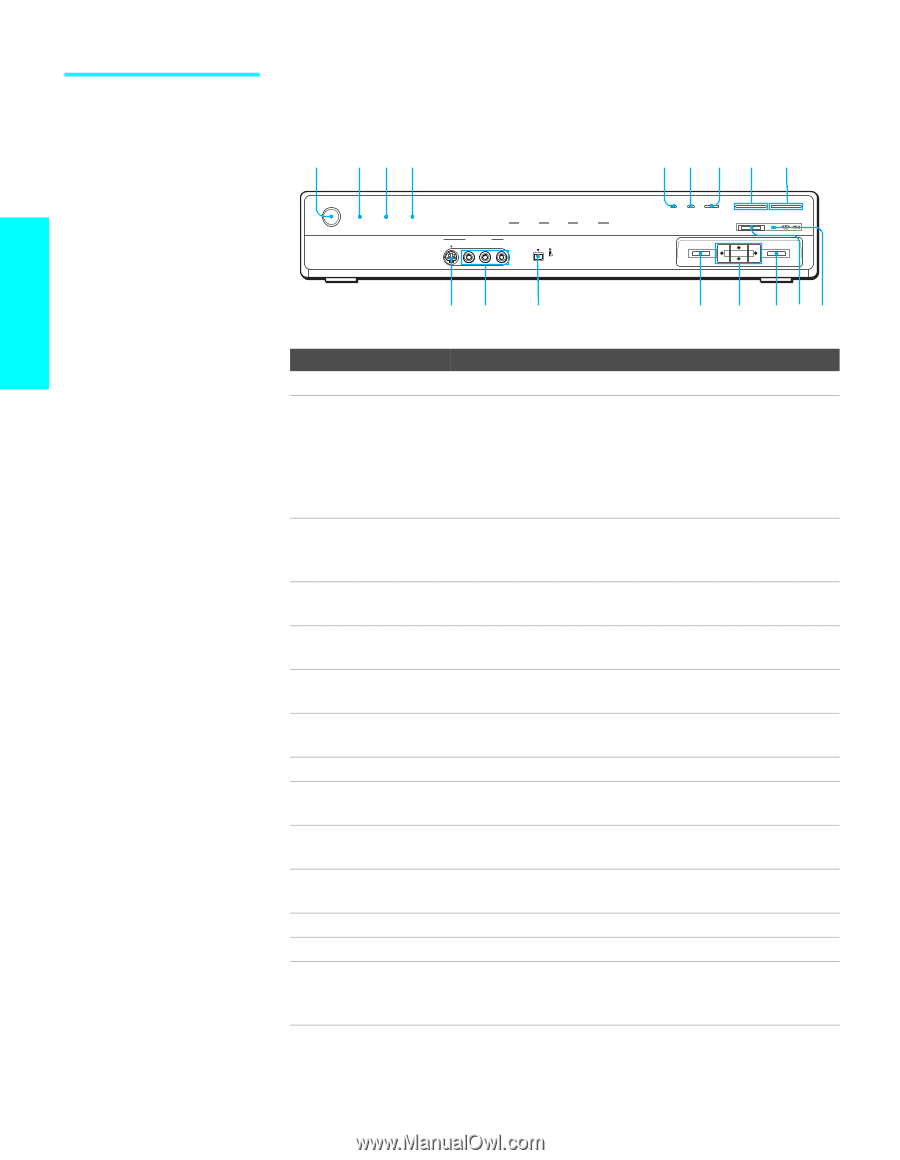
Media Receiver Unit Front Panel, Main POWER, POWER, STANDBY LED, TIMER LED, i.LINK, PIC OFF - turn off
 |
View all Sony KDL-42XBR950 manuals
Add to My Manuals
Save this manual to your list of manuals |
Page 22 highlights
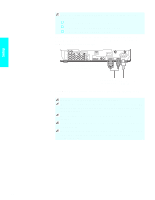
Setup Media Receiver Unit Front Panel 1 234 56 7 8 9 POWER POWER/STANDBY TIMER i.LINK/STANDBY TV VIDEO MEMORY STICK i.LINK VIDEO 2 IN S VIDEO VIDEO L - AUDIO -R i.LINK S400 DV/MICROMV PIC OFF i.LINK INPUT SELECT - VOL + - CHANNEL + MENU ENTER qj qh qg qf qd qsqa0 Item Description 1 Main POWER Press to turn on and off the main power of the TV Set. 2 POWER/ STANDBY LED Lights up in green when the TV set is turned on. The LED lights up in red when in standby mode. The LED does not light up when the main power is turned off. If the LED blinks in red continuously, this may indicate the media receiver unit needs servicing (see "Contacting Sony" on page 121). 3 TIMER LED When lit, indicates one of the timers is set. When the timer is set, this LED will remain lit even if the TV set is turned off. For details, see page 117. 4 i.LINK/ When lit in red, indicates the i.LINK Standby is on. For STANDBY LED details, see page 118. 5 PIC OFF Press to have the TV screen turn off. For details, see page 73. 6 i.LINK Press to display the i.LINK Control Panel. For details, see page 97. 7 INPUT SELECT Press repeatedly to cycle through the video equipment connected to the TV's video inputs. 8 - VOL + Press to adjust the volume. 9 - CHANNEL + Press to scan through channels. To scan quickly through channels, press and hold down either CHANNEL. 0 Memory Stick When lit, indicates that the Memory Stick is being read. indicator (Do not remove the Memory Stick when the indicator is lit.) qa Memory Stick Memory Stick insertion slot. For details, see "Inserting and slot Removing a Memory Stick" on page 81. qs ENTER Press to select an on-screen menu item. qd V v B b Press to move the on-screen cursor. qf MENU Press to display the Menu. Press again to exit from the Menu. For details, see page 101. 20
-
 1
1 -
2
-
3
-
4
-
5
-
6
-
7
-
8
-
9
-
10
-
11
-
12
-
13
-
14
-
15
-
16
-
 17
17 -
 18
18 -
 19
19 -
 20
20 -
 21
21 -
 22
22 -
 23
23 -
 24
24 -
 25
25 -
 26
26 -
 27
27 -
28
-
29
-
30
-
31
-
32
-
33
-
34
-
35
-
36
-
37
-
38
-
39
-
40
-
41
-
42
-
43
-
44
-
45
-
46
-
47
-
48
-
49
-
50
-
51
-
52
-
53
-
54
-
55
-
56
-
57
-
58
-
59
-
60
-
61
-
62
-
63
-
64
-
65
-
66
-
67
-
68
-
69
-
70
-
71
-
72
-
73
-
74
-
75
-
76
-
77
-
78
-
79
-
80
-
81
-
82
-
83
-
84
-
85
-
86
-
87
-
88
-
89
-
90
-
91
-
92
-
93
-
94
-
95
-
96
-
97
-
98
-
99
-
100
-
101
-
102
-
103
-
104
-
105
-
106
-
107
-
108
-
109
-
110
-
111
-
112
-
113
-
114
-
115
-
116
-
117
-
118
-
119
-
120
-
121
-
122
-
123
-
124
-
125
-
126
-
127
-
128
-
129
-
130
-
131
-
132
-
133
-
134
-
135
-
136
 |
 |