Sony KDL-48W650D Operating Instructions Setup Guide - Page 40
Additional Information, Using a Wall-Mount Bracket, Detaching the Table-Top Stand from the TV
 |
View all Sony KDL-48W650D manuals
Add to My Manuals
Save this manual to your list of manuals |
Page 40 highlights
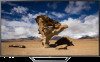
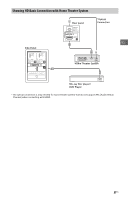
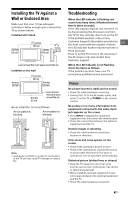
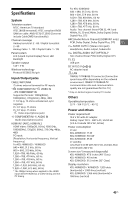
Additional Information Using a Wall-Mount Bracket This TV's instruction manual only shows the steps on preparing the installation of the TV before installing to the wall. Your TV can be mounted on a wall using a Wall-Mount Bracket (not supplied) out of the box as packaged. If the Table-Top Stand is attached to the TV, the TV may require detaching the Table-Top Stand; see page 40 (Detaching the Table-Top Stand from the TV). Prepare the TV for the Wall-Mount Bracket before making cable connections. For product protection and safety reasons, Sony strongly recommends that installation of your TV on the wall be performed by qualified professionals. Do not attempt to install it yourself. Follow the instruction guide provided with the Wall-Mount Bracket for your model. Sufficient expertise is required in installing this TV, especially to determine the strength of the wall for withstanding the TV's weight. The length of the screw for Wall-Mount Bracket differs depending on the WallMount Bracket thickness. Please see below illustration. 10 mm - 12 mm Detaching the Table-Top Stand from the TV To detach the Table-Top Stand from the TV, remove the screws. Note • Do not remove the Table-Top Stand for any reason other than to install corresponding accessories on the TV. • When removing the Table-Top Stand from the TV, lay the display face down on a stable work surface that is larger than the TV. • To prevent damaging the surface of the LCD display, make sure to place a soft cloth on the work surface. • Be sure the TV is vertical before turning on. To avoid uneven picture uniformity do not power on the TV with the LCD panel facing down. • When attaching the Table-Top Stand again, be sure to fasten the screws (previously removed) to the original holes on the rear of the TV. Screw (supplied with the Wall-Mount Bracket) Wall-Mount Bracket Be sure to store the unused screws and Table-Top Stand in a safe place until you are ready to attach the Table-Top Stand. Keep the screws away from small children. Note • Read the supplied Safety Booklet for additional safety information. 40US
-
 1
1 -
2
-
3
-
4
-
5
-
6
-
7
-
8
-
9
-
10
-
11
-
12
-
13
-
14
-
15
-
16
-
17
-
18
-
19
-
20
-
21
-
22
-
23
-
24
-
25
-
26
-
27
-
28
-
29
-
30
-
31
-
32
-
33
-
34
-
 35
35 -
 36
36 -
 37
37 -
 38
38 -
 39
39 -
 40
40 -
 41
41 -
 42
42 -
 43
43 -
 44
44 -
 45
45 -
46
-
47
-
48
-
49
-
50
-
51
-
52
-
53
-
54
-
55
-
56
-
57
-
58
-
59
-
60
-
61
-
62
-
63
-
64
-
65
-
66
-
67
-
68
-
69
-
70
-
71
-
72
-
73
-
74
-
75
-
76
-
77
-
78
-
79
-
80
-
81
-
82
-
83
-
84
-
85
-
86
-
87
-
88
-
89
-
90
-
91
-
92
-
93
-
94
-
95
-
96
-
97
-
98
-
99
-
100
-
101
-
102
-
103
-
104
 |
 |