Sony KE-42XBR900 Instructions (SU-P42T1/SU-P50T1 Tabletop Stand) - Page 5
Step 1: Check the parts, Install the Main Bracket
 |
View all Sony KE-42XBR900 manuals
Add to My Manuals
Save this manual to your list of manuals |
Page 5 highlights
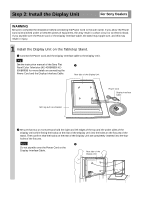
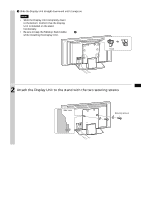
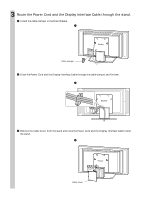
Step 1: Check the parts For Sony Dealers • Prepare a Phillips screwdriver beforehand. • Exercise extreme care to avoid injury when installing the Main Bracket. Main Bracket (1 piece) Stand (1 piece) Name Securing screw Quantity 2 Countersink screw 10 Cable clamper 1 Step 2: Install the Main Bracket For Sony Dealers 1 Align the Main Bracket over the screw holes on the stand. Then fasten the Main Bracket to the stand using 10 countersink screws. Be sure that two or more persons hold the parts during this procedure. Tighten the 10 countersink screws once again after screwing them temporarily. Caution • Be sure to hold the stand firmly and keep it stable. • When you use an electric driver to tighten screws, tightening torque must be approx. 1.81 Ft·lbs (2.45N·m). Do not use impact drivers. If you use impact drivers or electric drivers with the tightening torque other than 1.81 Ft·lbs (2.45N·m), you will overtighten the screws. This may destroy parts or screws, cause the Main Bracket to drop off from the stand, leading to any injury. Main Bracket Countersink screws Stand 5 (US)
-
 1
1 -
 2
2 -
 3
3 -
 4
4 -
 5
5 -
 6
6 -
 7
7 -
 8
8 -
 9
9 -
 10
10 -
 11
11 -
12
-
13
-
14
-
15
-
16
-
17
-
18
-
19
-
20
-
21
-
22
-
23
-
24
-
25
-
26
-
27
-
28
-
29
-
30
-
31
-
32
 |
 |
