Sony KE-42XBR900 Instructions (SU-P42T1/SU-P50T1 Tabletop Stand) - Page 6
Step 3: Install the Display Unit - cable
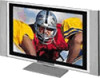 |
View all Sony KE-42XBR900 manuals
Add to My Manuals
Save this manual to your list of manuals |
Page 6 highlights
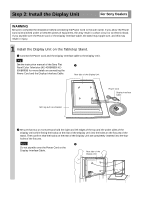
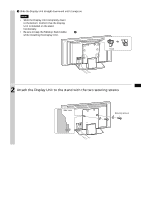
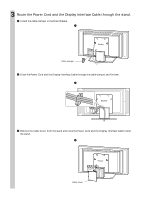
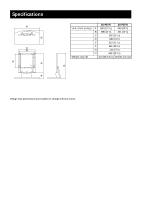
Step 3: Install the Display Unit For Sony Dealers WARNING Be sure to complete the installation before connecting the Power Cord to the wall outlet. If you allow the Power Cord to be pinched under or between pieces of equipment, this may result in a short circuit or an electric shock. If you stumble over the Power Cord or the Display Interface Cable, the stand may topple over, and this may result in injury. 1 Install the Display Unit on the Tabletop Stand. 1 Connect the Power Cord and the Display Interface cable to the Display Unit. Tip See the instruction manual of the Sony Flat Panel Color Television (KE-42XBR900/KE50XBR900) for more details on connecting the Power Cord and the Display Interface Cable. 1 Rear side of the Display Unit Soft rag such as a blanket Power Cord Display Interface Cable 2 Be sure that two or more persons hold the right and left edges of the top and the under sides of the Display Unit while fitting the hooks on the rear of the Display Unit into the holes on the fixtures of the stand. Then confirm that the hooks on the rear of the Display Unit are completely inserted into the four holes of the fixtures. Note 2 Do not stumble over the Power Cord or the Display Interface Cable. Rear side of the Display Unit 6 (US)
-
 1
1 -
 2
2 -
 3
3 -
 4
4 -
 5
5 -
 6
6 -
 7
7 -
 8
8 -
 9
9 -
 10
10 -
 11
11 -
 12
12 -
13
-
14
-
15
-
16
-
17
-
18
-
19
-
20
-
21
-
22
-
23
-
24
-
25
-
26
-
27
-
28
-
29
-
30
-
31
-
32
 |
 |
