Sony KP-53S75 Operating Instructions
Sony KP-53S75 - 53" Color Rear Video Projector Manual
 |
View all Sony KP-53S75 manuals
Add to My Manuals
Save this manual to your list of manuals |
Sony KP-53S75 manual content summary:
- Sony KP-53S75 | Operating Instructions - Page 1
4-077-171-11(1) Color Rear Video Projector Operating Instructions KP-43T75 KP-48S75 KP-53S75 KP-53N77 KP-61S75 © 2000 Sony Corporation - Sony KP-53S75 | Operating Instructions - Page 2
your authority to operate this equipment. This document is for the remote control RM-Y906 MODELS: KP-43T75, KP-48S75, KP-53S75, KP-53N77, KP-61S75 Please keep this notice with the instruction manual. As an ENERGY STAR Partner, Sony Corporation has determined that this product meets the ENERGY STAR - Sony KP-53S75 | Operating Instructions - Page 3
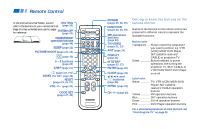
select the component you want to control; e.g. VTR (VCR)/MDP/DVD Player, SAT (satellite receiver)/ CABLE, or projection TV. Green Buttons relevant to power operations, like turning the projection TV, SAT/CABLE, or VTR (VCR)/MDP/DVD Player on or off Label color White TV/VTR (VCR)/MDP/DVD Player/SAT - Sony KP-53S75 | Operating Instructions - Page 4
Connecting a Sony SAVA series speaker system 17 Basic Set Up 18 Using the Remote Control 18 Setting Up the Projection TV Automatically 18 Adjusting the Convergence Automatically (FLASH FOCUS 19 Using Your New Projection TV .... 20 Watching the TV 20 Watching Two Programs at One Time - PIP 23 - Sony KP-53S75 | Operating Instructions - Page 5
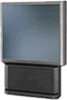
the Sony Color Rear Video Projection TV. This manual is for models KP-43T75, KP48S75, KP-53S75, KP-53N77, KP-61S75. Model KP-53S75 is used for illustration purposes. The features you will enjoy include: • FLASH FOCUS, allowing you to adjust convergence automatically. • Parental Control, enabling - Sony KP-53S75 | Operating Instructions - Page 6
or if the room temperature changes suddenly, the picture may be blurred or show poor color. In this case, please wait a few hours to let the moisture evaporate before turning on the projection TV. • To obtain the best picture, do not expose the screen to direct illumination or direct sunlight. It is - Sony KP-53S75 | Operating Instructions - Page 7
placed on the set, or described in the operating instructions or service manual. WARNING To guard against injury, the following basic safety precautions should be observed in the installation, use, and servicing of the set. Use Power Sources This set should be operated only from the type - Sony KP-53S75 | Operating Instructions - Page 8
while the projection TV is operating, unplug the projection TV and consult your dealer or service technician. It is normal for some projection TV sets to make occasional snapping or popping sounds, particularly when being turned on or off. 4 Installation Water and Moisture Do not use power-line - Sony KP-53S75 | Operating Instructions - Page 9
Grounding. Ground clamp Electric service equipment NEC: National Electrical Code Antenna lead-in wire Antenna discharge unit (NEC Section 810-20) Grounding conductors (NEC Section 810-21) Ground clamps Power service grounding electrode system (NEC Art 250 Part H) Lightning For added protection - Sony KP-53S75 | Operating Instructions - Page 10
certifies in writing that he has used replacement parts specified by the manufacturer that have the same characteristics as the original parts. Unauthorized substitutions may result in fire, electric shock, or other hazards. Safety Check Upon completion of any service or repairs to the set, ask the - Sony KP-53S75 | Operating Instructions - Page 11
Projection TV Carrying Your Projection TV Carrying the projection TV requires three or more people. For KP-48S75/53S75/53N77/61S75 The projection TV has been equipped with casters for easy movement on a hard surface. Please move your projection TV using the casters. Installing the Projection TV - Sony KP-53S75 | Operating Instructions - Page 12
guides and push into connection. Push into connection. About the CONTROL S OUT jack To control other Sony equipment with the projection TV's remote control, connect the CONTROL S IN jack of the equipment to the CONTROL S OUT jack on the projection TV with the CONTROL S cable. (Rear of projection - Sony KP-53S75 | Operating Instructions - Page 13
able to receive using an antenna. (Rear of projection TV) Coaxial cable AUX (No connection "TO CONVERTER" in this case) Antenna cable TO CONVERTER VHF/UHF Select Cable or ANT mode by pressing ANT on the remote control. Connecting a cable box Some pay cable TV systems use scrambled or encoded - Sony KP-53S75 | Operating Instructions - Page 14
Left, Red10AUDIO Right**). S VIDEO (Rear of projection TV) Coaxial cable AUX 1 TO CONVERTER Cable/ Antenna IN VIDEO 1 VIDEO 3 S VIDEO OUT MONITOR AUDIO (VAR/FIX) VIDEO Y VIDEO L (MONO) AUDIO R L PB (MONO) AUDIO PR R VHF/UHF Splitter (not supplied) AUDIO R AUDIO L VIDEO LINE - Sony KP-53S75 | Operating Instructions - Page 15
the remote control. Disconnect all power sources before making any connections. (Rear of projection TV) AUX TO CONVERTER Cable/ Antenna 2 Satellite antenna cable 1 IN VIDEO 1 VIDEO 3 S VIDEO OUT MONITOR AUDIO (VAR/FIX) VIDEO Y VIDEO L (MONO) AUDIO R L PB (MONO) AUDIO PR R COMPONENT - Sony KP-53S75 | Operating Instructions - Page 16
Projection TV (continued) Connecting a satellite receiver Disconnect all power TV/VIDEO on the remote control. S VIDEO (Rear of projection TV) IN VIDEO 1 VIDEO 3 S VIDEO OUT MONITOR AUDIO (VAR/FIX cable VMC-810S/ 820S (not supplied) YC-15V/ 4 30V (not supplied) AUDIO R AUDIO L VIDEO LINE - Sony KP-53S75 | Operating Instructions - Page 17
TV using VIDEO cables. S VIDEO (Rear of projection TV) YC-15V/30V (not supplied) 2 AUX IN VIDEO 1 VIDEO 3 S VIDEO OUT MONITOR AUDIO (VAR/FIX) VIDEO Y VIDEO TO CONVERTER VHF/UHF DTV receiver VHF/UHF IN VHF/UHF IN (DTV) SATELLITE IN VHF/SATELLITE OUT VCR LOW SPEED DATA CONTROL - Sony KP-53S75 | Operating Instructions - Page 18
the projection TV to the VCR LINE INPUT (see right). Doing so will cause program interference and other viewing problems. VCR (for playback) AUDIO R AUDIO L VIDEO LINE OUT OUT IN VIDEO AUDIO-L AUDIO-R 1 VMC-810S/820S (not supplied) IN VIDEO 1 VIDEO 3 S VIDEO OUT MONITOR AUDIO (VAR/FIX) VHF - Sony KP-53S75 | Operating Instructions - Page 19
all power sources before making any connections. (Rear of projection TV) AUX S VIDEO IN VIDEO 1 VIDEO 3 S VIDEO OUT MONITOR AUDIO (VAR/FIX) VIDEO Y VIDEO L (MONO) AUDIO R AUDIO-R AUDIO-L PB PR COMPONENT L (MONO) AUDIO R TO CONVERTER VHF/UHF RK-74A (not supplied) (Rear of projection TV - Sony KP-53S75 | Operating Instructions - Page 20
) Connecting an audio system Disconnect all power sources before making any connections. For more dynamic sound, connect an audio system to the projection TV. (Rear of projection TV) 1 Using an AUDIO cable, connect AUDIO (VAR/FIX) OUT on the projection TV to Stereo amplifier one of the unused - Sony KP-53S75 | Operating Instructions - Page 21
woofer mode with the remote control. (see "SAVA SP Control" on page 28) 1 Using the AUDIO cable supplied with the speaker to AUDIO (VAR/FIX) OUT on the projection TV. 2 Using the CONTROL S cable, connect CONTROL S IN on the speaker to CONTROL S OUT on the projection TV. Disconnect all power sources - Sony KP-53S75 | Operating Instructions - Page 22
on the front panel of the projection TV: - + FLASH FOCUS TV/VIDEO VOLUME - CHANNEL + POWER TIMER/STAND BY 1 Press POWER to turn on the projection TV. Press SET UP inside the drop-down panel on the projection TV and the AUTO SET UP screen appears. POWER English : Español : Français : Auto - Sony KP-53S75 | Operating Instructions - Page 23
Adjusting the Convergence Automatically (FLASH FOCUS) The projection tube image appears on the screen in three layers (red, green and blue). If they do not converge, the color is poor and the picture blurs. Before you use your projection TV, be sure to adjust the convergence. The FLASH FOCUS feature - Sony KP-53S75 | Operating Instructions - Page 24
Labeled Buttons for Projection TV Operations TV (FUNCTION) TV POWER 0-9 and ENTER CH +/- VOL +/- MUTING Activates the remote control for use with the projection TV. Turns the projection TV on and off. If a video input indication (e.g., VIDEO 1, VIDEO 2) appears on the screen, press TV/VIDEO until - Sony KP-53S75 | Operating Instructions - Page 25
), and MTS/SAP mode (if SAP is selected). The SAP indication disappears and the other indications dim three seconds later. To turn the display off, press DISPLAY again. (continued) REFER TO THE ILLUSTRATION OF THE REMOTE CONTROL ON THE INSIDE FRONT COVER OF THIS MANUAL AS YOU REVIEW THIS CHART 21 - Sony KP-53S75 | Operating Instructions - Page 26
you are finished using a VCR and you want to switch to the TV input. The VCR power will remain on. SYSTEM OFF Press to turn off the projection TV and all other Sony equipment. 22 REFER TO THE ILLUSTRATION OF THE REMOTE CONTROL ON THE INSIDE FRONT COVER OF THIS MANUAL AS YOU REVIEW THIS CHART - Sony KP-53S75 | Operating Instructions - Page 27
received. Main picture 6 10 Window picture TV channel or inputsource mode for the main picture* (yellowgreen-colored) TV channel or inputsource mode for the window picture* (white-colored) * It will dim in about 3 seconds. Tip z If you press RESET in PIP mode, the window picture will move to - Sony KP-53S75 | Operating Instructions - Page 28
of the two will be exchanged. REFER TO THE ILLUSTRATION OF THE REMOTE CONTROL ON THE INSIDE FRONT COVER OF THIS MANUAL AS YOU REVIEW THIS CHART Note: • If one of the pictures received through PIP is snowy, the entire screen may become unstable. In this case, erase the snowy channel. (see "Channel - Sony KP-53S75 | Operating Instructions - Page 29
Mode: Vivid Picture Adjustment Trinitone: High Noise Reduction: Off ch 3 Press V or v to highlight the desired option. Set Up Parental Control Caption Vision: CC1 Language: English Video Label Flash corrections, press MENU to exit the menu screens. MENU To exit from the menus at any - Sony KP-53S75 | Operating Instructions - Page 30
PICTURE MODE on the remote control for direct selection of a "Mode" setting. First select "Movie," "Personal 1" or "Personal 2" from "Mode brighten the picture; left (down) to darken it. Picture Brightness Color Hue ch Sharpness Color: Adjust slider right (up) to increase color intensity; - Sony KP-53S75 | Operating Instructions - Page 31
factory settings Press RESET on the remote control while the Audio menu is selected. * The BBE is manufactured by Sony Corporation under license from BBE Sound different sound transmission levels. Off: Sound output coming from the TV speakers varies according to the received channel. "Effect" can - Sony KP-53S75 | Operating Instructions - Page 32
to turn off the projection TV speakers and listen to the projection TV's sound only through the Sony SAVA series speaker system. You can adjust volume, muting, "Surround Mode," and "Super Woofer Mode" with the projection TV's remote control. (see "SAVA SP Control" below) Audio Out Easy control of - Sony KP-53S75 | Operating Instructions - Page 33
/ Off Timer ch --Move - - : - - AM Select Exit MENU After setting the clock you can use the timer to turn the projection TV on and off. For detailed information on using the remote control to modify menu settings, refer to "Learning Menu Selection" on page 25. To select the Timer menu: Display - Sony KP-53S75 | Operating Instructions - Page 34
the remote control to User's favorite channels You can add a caption for up to 32 channels of VHF/ UHF input. With the Channel Caption window open: 1 Press and then press V or v to select the desired channel. You can view the channel that is selected with the Channel Caption menu in the sub screen - Sony KP-53S75 | Operating Instructions - Page 35
. You can view the channel that is selected with the Channel Skip/Add menu in the sub screen. You can also use Channel Skip/Add ch 1: Skip 2: Skip 3: Add 4: Add 5: steps above and select Add. Select Yes to signal the projection TV to automatically program all receivable channels. When all the - Sony KP-53S75 | Operating Instructions - Page 36
Adjusting Your SET UP (menus) (continued) Setting and Selecting Favorite Channel The Favorite Channel feature of your projection TV enables easy access to the eight channels that you preset (or the last channel that you were watching). Your Favorite Channel options can be set - Sony KP-53S75 | Operating Instructions - Page 37
screen to adjust any of your favorite channel choices. Simply proceed as described in "Setting Favorite Channel manually" (skip step 2 if "Manual you wish to view from the menu. The picture of the selected channel will be displayed in the window picture. 3 Press to select the channel. The selected - Sony KP-53S75 | Operating Instructions - Page 38
Control Caption Vision: CC1 Language: English Video Label Flash Focus: No ch Move Select Exit MENU For detailed information on using the remote control or sound effects of a program. (The mode should be set to CC 1 for most or the whole screen. Notes: • Poor reception of TV programs can - Sony KP-53S75 | Operating Instructions - Page 39
DTV, Skip If you select "Skip," your projection TV will skip this connection when you scan through video sources using the TV/VIDEO button. Select Yes and press to start Flash Focus adjustment. When the adjustment is completed, the cross pattern on the screen becomes white. (for details, see page - Sony KP-53S75 | Operating Instructions - Page 40
feature of the TV functions by receiving the rating signal from your local broadcasting station or cable service provider. Activating the Parental Control Feature First, set a password, then select your desired rating from Sony's predetermined ratings. 36 1 Select "Parental Control" from the Set - Sony KP-53S75 | Operating Instructions - Page 41
and movies shown on TV. 1 Select "Parental Control" from the Set Up menu. (see page 34) Set Up Parental Control C a p t i o n VPi saisosnw: o r dC C 1 L a n g u a g e :_ _ _ _ Video Label ch Flash Focus: No Move Select Exit MENU 2 Enter your four digit password using the 0-9 buttons - Sony KP-53S75 | Operating Instructions - Page 42
the program, follow the steps below. 1 Press ENTER to display the "Password" screen. 2 Enter your password using the 0-9 buttons. Parental Control will be canceled ("Parental Lock" set to "Off") until you turn your projection TV off. Selecting a Custom Rating in U.S.A. If you want to select the - Sony KP-53S75 | Operating Instructions - Page 43
select "TV Rating," and press . TV Rating TV-Y _ TV-Y7 _ TV-G _ TV-PG _ TV-14 _ TV-MA _ :FV _ :D _ L _ S _ V _ :D _ L _ S _ V _ : L_S_V_ Select rating Move Select Exit MENU 6 Press V or v to select the TV rating to be blocked, and press . TV Rating TV-Y _ TV-Y7 _ TV-G _ TV-PG _ TV-14 _ TV-MA - Sony KP-53S75 | Operating Instructions - Page 44
the programs that match the ratings will be blocked. Movie Rating G - PG - PG-13 - R - NC-17 X - Select rating Move Select Exit MENU To block TV programs and/or movies for which a rating signal is not given (NR and N/A) For a description of the NR and N/A ratings, see page 44. 1 Perform - Sony KP-53S75 | Operating Instructions - Page 45
Up menu. (see page 34) Set Up Parental Control C a p t i o n VPi saisosnw: o r dC C 1 L a n g u a g e :_ _ _ _ Video Label ch Flash Focus: No Move Select Exit MENU 2 Enter your four digit password using the 0-9 buttons. The Parental Control menu appears. Make sure that "Country" is set - Sony KP-53S75 | Operating Instructions - Page 46
34) Set Up Parental Control C a p t i o n VPi saisosnw: o r dC C 1 L a n g u a g e :_ _ _ _ Video Label ch Flash Focus: No Move Select Exit MENU 2 Enter your four digit password using the 0-9 buttons. The Parental Control menu appears. Parental Control Country: U.S.A. Parental Lock: On - Sony KP-53S75 | Operating Instructions - Page 47
) • When you select a Parental Control program and the indicator is displayed on the screen, you cannot view that program even if you enter "4357." (see "To unlock the Parental Control feature temporarily" on page 38) What the Ratings Mean Ratings in U.S.A. Sony's predetermined ratings These are - Sony KP-53S75 | Operating Instructions - Page 48
7 and above. Themes and elements in this program may include mild fantasy violence or slapstick violence, or may frighten children under the age of 7. TV-G (General Audience): Most parents would find this program suitable for all ages. It contains little or no violence, no strong language and little - Sony KP-53S75 | Operating Instructions - Page 49
flashes or sports. Note: The TV-NR rating is shown as "Unrated" in the menu. About the extenders of U.S. TV ratings TV-Y7, TV-PG, TV-14 and TV-MA in these programs. Ratings in Canada Sony's predetermined ratings These are original ratings that Sony predetermined according to the viewer's age. - Sony KP-53S75 | Operating Instructions - Page 50
programming. Note: The E (Exempt) rating is not shown in the menu. Canadian French Language ratings The Canadian French Language Ratings are for TV programs in French broadcast in Canada. G (General): Programming intended for audience of all ages. Contains no violence, or the violence it contains - Sony KP-53S75 | Operating Instructions - Page 51
Operating Video Equipment Setting the Manufacturer's VCR manufacturer code numbers Code Manufacturer Sony (VHS VCR) Code 301 You can use the supplied remote control to Sony (8mm VCR) 302 operate Sony or non-Sony video equipment Sony (Beta, ED Beta, VCRs) 303 that has an infrared sensor. - Sony KP-53S75 | Operating Instructions - Page 52
Sony video equipment with the supplied remote control. In this case, please use the equipment's own remote control. • When you remove the batteries, the code . To change input mode Press TV/VTR. Operating an MDP using the remote control To turn On/Off Press DVD/VTR (POWER). [Green Button] - Sony KP-53S75 | Operating Instructions - Page 53
operating instructions that come with the equipment. The GUIDE and INDEX (blue-labeled) buttons can be used only with a satellite receiver. If the remote control doesn't work • Try repeating the set up procedures using the other codes listed for your equipment. To operate the projection TV Press TV - Sony KP-53S75 | Operating Instructions - Page 54
projection TV to turn it off, then inform qualified Sony personnel or the above Direct Response Center of the number of flashes. function) No picture (screen not lit), no sound • Make sure the power cord is plugged in. • Operate with the buttons on both the projection TV and the remote control - Sony KP-53S75 | Operating Instructions - Page 55
with sound recording in PIP mode from the other program. Cannot play shooting games • Some shooting games which involve pointing a light beam at the TV screen with an electronic gun or rifle cannot be used with this projection TV. For details, see the instruction manual supplied with the video - Sony KP-53S75 | Operating Instructions - Page 56
670 mm (54 × 61 3/8 × 26 3/8 inches) (KP-61S75) Mass 64.6 kg (142 lbs 5 oz) (KP-43T75) 64 kg (141 lbs 2 oz) (KP-48S75) 67.6 kg (149 lbs) (KP-53S75) 75.2 kg (165 lbs 13 oz) (KP-53N77) 84.6 kg (186 lbs 8 oz) (KP-61S75) Supplied accessories Remote control RM-Y906 (1) Batteries (2) size AA (R6) Optional - Sony KP-53S75 | Operating Instructions - Page 57
34, 36 Parental Control menu Change Password 42 Country 36 Custom Rating 38, 41 Parental Lock 36, 37 Rating 37 Password 36 Picture 26 Picture Adjustment 26 (Picture/Brightness/Color/Hue/ Sharpness) Picture-in-Picture (PIP 23 PICTURE MODE button 20 PIP operations ACTIVE B/b 23 AUDIO 24 53 - Sony KP-53S75 | Operating Instructions - Page 58
FREEZE 24 PIP 23 POSITION 23 SWAP 24 TV/VIDEO 23 R Remote control 18 Graphic Troubleshooting 50, 51 TV (FUNCTION) button 20 TV POWER button 20 TV rating 39 TV/VIDEO button 21, 23 TV this instruction manual, you have additional questions related to the use of your Sony projection TV, please
-
 1
1 -
 2
2 -
 3
3 -
 4
4 -
 5
5 -
 6
6 -
 7
7 -
8
-
9
-
10
-
11
-
12
-
13
-
14
-
15
-
16
-
17
-
18
-
19
-
20
-
21
-
22
-
23
-
24
-
25
-
26
-
27
-
28
-
29
-
30
-
31
-
32
-
33
-
34
-
35
-
36
-
37
-
38
-
39
-
40
-
41
-
42
-
43
-
44
-
45
-
46
-
47
-
48
-
49
-
50
-
51
-
52
-
53
-
54
-
55
-
56
-
57
-
58
 |
 |
© 2000 Sony Corporation
Color Rear Video Projector
4-077-171-
11
(1)
Operating Instructions
KP-43T75
KP-48S75
KP-53S75
KP-53N77
KP-61S75