Sony KV-32XBR250 Operating Instructions - Page 13
Satellite Connections
 |
View all Sony KV-32XBR250 manuals
Add to My Manuals
Save this manual to your list of manuals |
Page 13 highlights
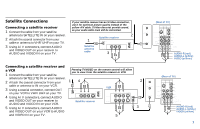
Satellite Connections Connecting a satellite receiver 1 Connect the cable from your satellite antenna to SATELLITE IN on your receiver. 2 Attach the coaxial connector from your cable or antenna to VHF/UHF on your TV. 3 Using A/V connectors, connect AUDIO and VIDEO OUT on your receiver to AUDIO and VIDEO IN on your TV. If your satellite receiver has an S Video connection, use it for optimum picture quality instead of the yellow A/V cable. S Video does not provide sound, so your audio cable must still be connected. 1 Satellite antenna cable Satellite receiver SATELLITE IN AUDIO R AUDIO L VIDEO LINE OUT 3 2 VHF/UHF IN OUT AUX TO CONVERTER VHF/UHF (Rear of TV) VIDEO IN 1 3 4 Y S VIDEO PB VIDEO L (MONO) AUDIO R PR L AUDIO R S-LINK CONTROL S OUT AUDIO-R (red) AUDIO-L (white) VIDEO (yellow) Connecting a satellite receiver and a VCR 1 Connect the cable from your satellite antenna to SATELLITE IN on your receiver. 2 Attach the coaxial connector from your cable or antenna to IN on your VCR. 3 Using a coaxial connector, connect OUT on your VCR to VHF/UHF on your TV. 4 Using A/V connectors, connect AUDIO and VIDEO OUT on your receiver to AUDIO and VIDEO IN on your VCR. 5 Using A/V connectors, connect AUDIO and VIDEO OUT on your VCR to AUDIO and VIDEO IN on your TV. Pressing TV/VIDEO on the remote control will allow you to view from the satellite receiver or VCR. 14 2 SATELLITE IN LINE OUT VHF/UHF AUDIO R AUDIO L VIDEO S VIDEO IN OUT Satellite receiver VCR LINE IN LINE OUT AUDIO R AUDIO L VIDEO S VIDEO VHF/UHF IN OUT 3 5 AUX TO CONVERTER VHF/UHF (Rear of TV) VIDEO IN 1 3 4 Y S VIDEO PB VIDEO L (MONO) AUDIO R PR L AUDIO R S-LINK CONTROL S OUT AUDIO-R (red) AUDIO-L (white) VIDEO (yellow) 7
-
 1
1 -
2
-
3
-
4
-
5
-
6
-
7
-
 8
8 -
 9
9 -
 10
10 -
 11
11 -
 12
12 -
 13
13 -
 14
14 -
 15
15 -
 16
16 -
 17
17 -
 18
18 -
19
-
20
-
21
-
22
-
23
-
24
-
25
-
26
-
27
-
28
-
29
-
30
-
31
-
32
-
33
-
34
-
35
-
36
-
37
-
38
-
39
-
40
-
41
-
42
-
43
-
44
-
45
-
46
 |
 |
