Sony MVC-FD83 Installations/Connexions - Page 48
Copying all the infomation in your floppy disk – DISK COPY, When INSERT FLOPPY DISK is displayed - software
 |
View all Sony MVC-FD83 manuals
Add to My Manuals
Save this manual to your list of manuals |
Page 48 highlights
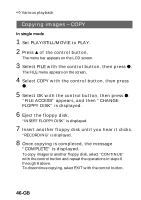
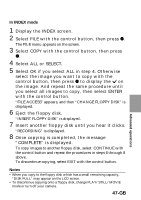
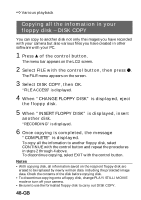
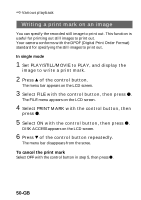
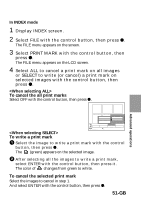
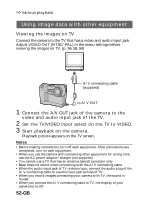
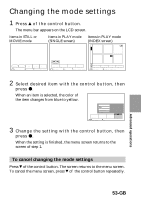
k Various playback Copying all the infomation in your floppy disk - DISK COPY You can copy to another disk not only the images you have recorded with your camera but also various files you have created in other software with your PC. 1 Press v of the control button. The menu bar appears on the LCD screen. 2 Select FILE with the control button, then press z. The FILE menu appears on the screen. 3 Select DISK COPY, then OK. "FILE ACCESS" is displayed. 4 When "CHANGE FLOPPY DISK" is displayed, eject the floppy disk. 5 When "INSERT FLOPPY DISK" is displayed, insert another disk. "RECORDING" is displayed. 6 Once copying is completed, the message "COMPLETE" is displayed. To copy all the infomation to another floppy disk, select CONTINUE with the control button and repeat the procedures in steps 2 through 4 above. To discontinue copying, select EXIT with the control button. Notes • With copying disk, all information saved on the recipient floppy disk are erased to be replaced by newly written data including the protected image data. Check the contents of the disk before copying disk. • To discontinue copying onto a floppy disk, change PLAY/STILL/MOVIE mode or turn off your camera. • Be sure to use the formatted floppy disk to carry out DISK COPY. 48-GB
-
 1
1 -
2
-
3
-
4
-
5
-
6
-
7
-
8
-
9
-
10
-
11
-
12
-
13
-
14
-
15
-
16
-
17
-
18
-
19
-
20
-
21
-
22
-
23
-
24
-
25
-
26
-
27
-
28
-
29
-
30
-
31
-
32
-
33
-
34
-
35
-
36
-
37
-
38
-
39
-
40
-
41
-
42
-
 43
43 -
 44
44 -
 45
45 -
 46
46 -
 47
47 -
 48
48 -
 49
49 -
 50
50 -
 51
51 -
 52
52 -
 53
53 -
54
-
55
-
56
-
57
-
58
-
59
-
60
-
61
-
62
-
63
-
64
-
65
-
66
-
67
-
68
-
69
-
70
-
71
-
72
-
73
-
74
-
75
-
76
-
77
-
78
-
79
-
80
-
81
-
82
-
83
-
84
-
85
-
86
-
87
-
88
-
89
-
90
-
91
-
92
-
93
-
94
-
95
-
96
-
97
-
98
-
99
-
100
-
101
-
102
-
103
-
104
-
105
-
106
-
107
-
108
-
109
-
110
-
111
-
112
-
113
-
114
-
115
-
116
-
117
-
118
-
119
-
120
-
121
-
122
-
123
-
124
-
125
-
126
-
127
-
128
-
129
-
130
-
131
-
132
 |
 |
