Sony MZ-N1 Operating Instructions - Page 24
Transferring songs from the computer to the MiniDisc (Check-out), Make connections. - driver
 |
View all Sony MZ-N1 manuals
Add to My Manuals
Save this manual to your list of manuals |
Page 24 highlights
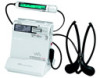
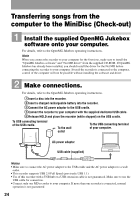
Transferring songs from the computer to the MiniDisc (Check-out) 1 Install the supplied OpenMG Jukebox software onto your computer. For details, refer to the OpenMG Jukebox operating instructions. Note When you connect the recorder to your computer for the first time, make sure to install the "OpenMG Jukebox software" and "Net MD driver" from the supplied CD-ROM. If OpenMG Jukebox has already been installed, you should install the driver for the Net MD before connecting the recorder to your computer. Even if the recorder is connected to the computer, control of the computer will not be possible without installing the software and driver. 2 Make connections. For details, refer to the OpenMG Jukebox operating instructions. 1Insert a disc into the recorder. 2Insert a charged rechargeable battery into the recorder. 3Connect the AC power adaptor to the USB cradle. 4Connect the recorder to your computer with the supplied dedicated USB cable. 5Release HOLD and place the recorder (while stopped) on the USB cradle. To USB connecting terminal of the USB cradle. To the wall outlet To the USB connecting terminal of your computer. AC power adaptor USB cable (supplied) Notes • Make sure to connect the AC power adaptor to the USB cradle and the AC power adaptor to a wall outlet. • This recorder supports USB 2.0 Full Speed (previously USB 1.1). • Use of this recorder with a USB hub or a USB extension cable is not guaranteed. Make sure to use the USB cable for connection. • Connect only one MD recorder to your computer. If more than one recorder is connected, normal operation is not guaranteed. 24
-
 1
1 -
2
-
3
-
4
-
5
-
6
-
7
-
8
-
9
-
10
-
11
-
12
-
13
-
14
-
15
-
16
-
17
-
18
-
 19
19 -
 20
20 -
 21
21 -
 22
22 -
 23
23 -
 24
24 -
 25
25 -
 26
26 -
 27
27 -
 28
28 -
 29
29 -
30
-
31
-
32
-
33
-
34
-
35
-
36
-
37
-
38
-
39
-
40
-
41
-
42
-
43
-
44
-
45
-
46
-
47
-
48
-
49
-
50
-
51
-
52
-
53
-
54
-
55
-
56
-
57
-
58
-
59
-
60
-
61
-
62
-
63
-
64
-
65
-
66
-
67
-
68
-
69
-
70
-
71
-
72
-
73
-
74
-
75
-
76
-
77
-
78
-
79
-
80
-
81
-
82
-
83
-
84
-
85
-
86
-
87
-
88
-
89
-
90
-
91
-
92
-
93
-
94
-
95
-
96
 |
 |
