Sony MZ-R37SP Operating Instructions - Page 14
Checking the remaining time or the recording position
 |
UPC - 027242566194
View all Sony MZ-R37SP manuals
Add to My Manuals
Save this manual to your list of manuals |
Page 14 highlights
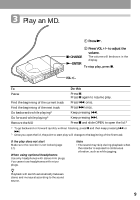
3 While observing the level meter in the display, adjust the recording level by pressing + (+) or = (-). Set the level so that it hits the 5th indicator from the left (i.e., the length of the lit recording level indicator reaches the full length of the recording level guide) at maximum input level. Recording level guide Checking the remaining time or the recording position You can check the remaining time, track number, etc. when recording or during stop. DISPLAY•EDIT•INSERT Bottom REC19 Note Adjust the recording level while the recorder is in standby mode. You cannot adjust it while recording. 4 Press P again to start recording. To stop recording, press p. The recording level control is switched back to automatic control when you record the next time. 14 1 Press DISPLAY while recording or in stop mode. Each time you press the button, the display changes as follows. 001 B While recording A Track number Track number A B Elapsed time Remaining time for recording In stop mode A B Track number Elapsed time Track name1) Remaining time for recording Disc name1) Remaining time after the current location 1)Appears only if the track has been labeled. z If you want to check the playing position or track name while playing, see page 16.
-
 1
1 -
2
-
3
-
4
-
5
-
6
-
7
-
8
-
 9
9 -
 10
10 -
 11
11 -
 12
12 -
 13
13 -
 14
14 -
 15
15 -
 16
16 -
 17
17 -
 18
18 -
 19
19 -
20
-
21
-
22
-
23
-
24
-
25
-
26
-
27
-
28
-
29
-
30
-
31
-
32
-
33
-
34
-
35
-
36
 |
 |
