Sony MZR500PC Operating Instructions - Page 25
Editing recorded tracks, Erasing tracks, To erase a track, To erase the whole disc
 |
UPC - 027242584969
View all Sony MZR500PC manuals
Add to My Manuals
Save this manual to your list of manuals |
Page 25 highlights
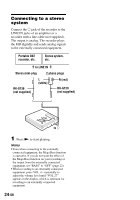
Editing recorded tracks You can edit your recordings by adding/ erasing track marks or labeling tracks and MDs. Premastered MDs cannot be edited. Notes on editing • Do not move or jog the recorder while "Edit" is flashing in the display. • You cannot edit tracks on an MD that is record-protected. Before editing tracks, close the tab on the side of the MD (page 31). • If you perform an editing operation while playing, be sure not to turn the power off until "Edit" disappears in the display. • The lid does not open until "Edit" disappears in the display after editing. Erasing tracks 2 Press >MENU. repeatedly until " " and "Erase" flash in the display, and then press ENTER. "Erase?" and "ENTER" appear alternately in the display. To cancel erasing, press x. 3 Press ENTER. The track is erased and the next track starts to play. All the tracks after the one erased are automatically renumbered. To erase a part of a track Add track marks at the beginning and the end of the part you want to erase, then erase the part (page 26). To erase a track Note that once a recording has been erased, you cannot retrieve it. Make sure of the track you are erasing. x To erase the whole disc You can quickly erase all the tracks and data of the MD at the same time. Note that once a recording has been erased, you cannot retrieve it. Be sure to check the contents of the disc you want to erase. x >MENU. ENTER 1 While playing the track you want to erase, press ENTER, press >MENU. repeatedly until "EDIT" flashes in the display, and then press ENTER again. " " and "Name" flash in the display, and the recorder plays the selected track repeatedly. >MENU. ENTER 1 While the recorder is stopped, press ENTER, press >MENU. repeatedly until "EDIT" flashes in the display, and then press ENTER again. " " and "Name" flash in the display. continued 25-GB
-
 1
1 -
2
-
3
-
4
-
5
-
6
-
7
-
8
-
9
-
10
-
11
-
12
-
13
-
14
-
15
-
16
-
17
-
18
-
19
-
 20
20 -
 21
21 -
 22
22 -
 23
23 -
 24
24 -
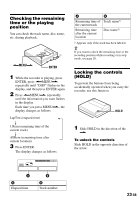
 25
25 -
 26
26 -
 27
27 -
 28
28 -
 29
29 -
 30
30 -
31
-
32
-
33
-
34
-
35
-
36
-
37
-
38
-
39
-
40
 |
 |
