Sony PC350 Camera Operations Guide - Page 17
the AC Adaptor, To check the remaining battery - Battery - walls
 |
UPC - 027242654839
View all Sony PC350 manuals
Add to My Manuals
Save this manual to your list of manuals |
Page 17 highlights
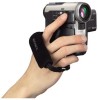
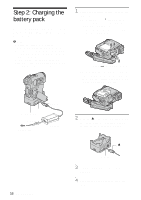
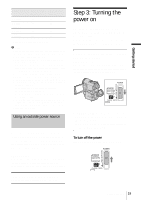
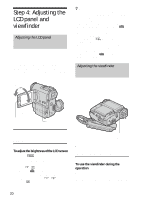
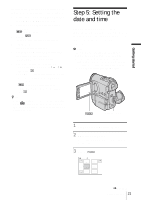
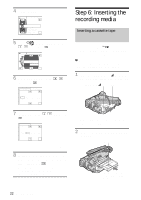
5 Insert your camcorder into the Handycam Station. After charging the battery The CHARGE lamp turns off when the battery is fully charged. Disconnect the AC Adaptor from the DC IN jack. To remove the battery pack Battery pack Getting started 6 Slide the POWER switch up to OFF (CHG). The CHARGE lamp lights up and charging starts. To charge the battery pack using only the AC Adaptor DC plug DC IN jack Power cord To the wall outlet AC Adaptor You can charge the battery pack on a trip, even if you have not brought the Handycam Station along. With the v mark on the DC plug facing front, connect the AC Adaptor to the DC IN jack on your camcorder as shown in the illustration. BATT POWER switch (battery release) lever 1 Set the POWER switch to OFF (CHG). 2 Slide the BATT (battery release) lever in the direction of 1 and push it down in the direction of 2. Remove the battery pack when it lifts up in the direction of 3. b Note • Be careful not to drop the battery pack when you remove the battery pack if your camcorder is in a vertical state. • Always attach the terminal cover to protect the battery terminal. If you do not use the battery pack for a long time, use up the battery pack completely before storing it. See page 131 about storage of the battery pack. To check the remaining battery - Battery Info DISPLAY/BATT INFO POWER switch ,continued Getting started 17
-
 1
1 -
2
-
3
-
4
-
5
-
6
-
7
-
8
-
9
-
10
-
11
-
 12
12 -
 13
13 -
 14
14 -
 15
15 -
 16
16 -
 17
17 -
 18
18 -
 19
19 -
 20
20 -
 21
21 -
 22
22 -
23
-
24
-
25
-
26
-
27
-
28
-
29
-
30
-
31
-
32
-
33
-
34
-
35
-
36
-
37
-
38
-
39
-
40
-
41
-
42
-
43
-
44
-
45
-
46
-
47
-
48
-
49
-
50
-
51
-
52
-
53
-
54
-
55
-
56
-
57
-
58
-
59
-
60
-
61
-
62
-
63
-
64
-
65
-
66
-
67
-
68
-
69
-
70
-
71
-
72
-
73
-
74
-
75
-
76
-
77
-
78
-
79
-
80
-
81
-
82
-
83
-
84
-
85
-
86
-
87
-
88
-
89
-
90
-
91
-
92
-
93
-
94
-
95
-
96
-
97
-
98
-
99
-
100
-
101
-
102
-
103
-
104
-
105
-
106
-
107
-
108
-
109
-
110
-
111
-
112
-
113
-
114
-
115
-
116
-
117
-
118
-
119
-
120
-
121
-
122
-
123
-
124
-
125
-
126
-
127
-
128
-
129
-
130
-
131
-
132
-
133
-
134
-
135
-
136
-
137
-
138
-
139
-
140
-
141
-
142
-
143
-
144
-
145
-
146
-
147
-
148
-
149
-
150
-
151
-
152
 |
 |
