Sony PC350 Camera Operations Guide - Page 30
Recording movies fit for breaking into still images – Progressive recording mode
 |
UPC - 027242654839
View all Sony PC350 manuals
Add to My Manuals
Save this manual to your list of manuals |
Page 30 highlights
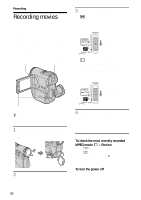
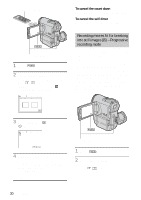
REC START/STOP REC START/STOP 1 Touch . 2 Touch [SELF-TIMER]. If the item is not displayed on the screen, touch / . If you cannot find it, touch [MENU], and select it from the (CAMERA SET) menu (p. 65). 60min STBY SELF-TIMER: OFF 0:00:00 OFF ON To cancel the count down Touch [RESET] or press REC START/STOP. To cancel the self-timer Follow steps 1 and 2, then select [OFF] in step 3. Recording movies fit for breaking into still images - Progressive recording mode This feature is useful for movies you intend to import to your computer to produce still images. You can record pictures with less blurring than recording in the normal mode, producing pictures suitable for analyzing high-speed action such as sports. To enjoy as a movie, it is better to record the picture in the normal mode, since the image is recorded only every 1/30 of a second in the progressive recording mode. 3 Touch [ON], then . appears. 60min STBY 0:00:00 P-MENU 4 Press REC START/STOP. You will hear a beep sound counting down for about 10 seconds (The count down indication begins from 8). Recording starts. To stop recording, press REC START/ STOP. REC START/STOP 1 Touch . 2 Touch [PROGRE REC]. If the item is not displayed on the screen, touch / . If you cannot find it, touch 30 Recording
-
 1
1 -
2
-
3
-
4
-
5
-
6
-
7
-
8
-
9
-
10
-
11
-
12
-
13
-
14
-
15
-
16
-
17
-
18
-
19
-
20
-
21
-
22
-
23
-
24
-
 25
25 -
 26
26 -
 27
27 -
 28
28 -
 29
29 -
 30
30 -
 31
31 -
 32
32 -
 33
33 -
 34
34 -
 35
35 -
36
-
37
-
38
-
39
-
40
-
41
-
42
-
43
-
44
-
45
-
46
-
47
-
48
-
49
-
50
-
51
-
52
-
53
-
54
-
55
-
56
-
57
-
58
-
59
-
60
-
61
-
62
-
63
-
64
-
65
-
66
-
67
-
68
-
69
-
70
-
71
-
72
-
73
-
74
-
75
-
76
-
77
-
78
-
79
-
80
-
81
-
82
-
83
-
84
-
85
-
86
-
87
-
88
-
89
-
90
-
91
-
92
-
93
-
94
-
95
-
96
-
97
-
98
-
99
-
100
-
101
-
102
-
103
-
104
-
105
-
106
-
107
-
108
-
109
-
110
-
111
-
112
-
113
-
114
-
115
-
116
-
117
-
118
-
119
-
120
-
121
-
122
-
123
-
124
-
125
-
126
-
127
-
128
-
129
-
130
-
131
-
132
-
133
-
134
-
135
-
136
-
137
-
138
-
139
-
140
-
141
-
142
-
143
-
144
-
145
-
146
-
147
-
148
-
149
-
150
-
151
-
152
 |
 |
