Sony PCV-RX470DS VAIO User Guide (primary manual) - Page 39
Using Still mode
 |
View all Sony PCV-RX470DS manuals
Add to My Manuals
Save this manual to your list of manuals |
Page 39 highlights
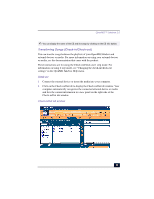
Smart Capture 2 Mode dial 6 Capture button Switches Smart Capture from Still mode to Net Movie mode with a single click of your mouse. Captures your individual still images in the same manner as a camera. You can select different characteristics for the Capture button when capturing a Net Movie. 3 Options button 7 Application Switch drop-down list Displays the configuration options Switches between the Still image and Net available for either Still or Net Movie mode. movie modes, using a drop-down list. 4 Effects button 8 Image window Displays the special effects that you can apply to your pictures or video clips. Displays the still or video image from your digital camera or camcorder. Using Still mode 1 From the Start button, point to Programs, point to Smart Capture, and then click on Smart Capture. The Smart Capture main window appears. 2 Connect your compatible i.LINK digital camera or camcorder to your computer with an i.LINK cable. An image appears in the Smart Capture main window. ✍ The Smart Capture main window opens with a blue screen image, indicating that there is no data input from a digital camera or camcorder. When you connect your digital camera or camcorder to your system with an i.LINK cable and turn it on, an image appears in the main window. Some cameras and camcorders need to have a recording media inserted before an image can be displayed in the Smart Capture window. Consult the manual that came with your digital camera or camcorder for more information. 3 Check that the Mode dial is set to Still. Click on the Mode dial to switch between Still mode and Net Movie mode. 39
-
 1
1 -
2
-
3
-
4
-
5
-
6
-
7
-
8
-
9
-
10
-
11
-
12
-
13
-
14
-
15
-
16
-
17
-
18
-
19
-
20
-
21
-
22
-
23
-
24
-
25
-
26
-
27
-
28
-
29
-
30
-
31
-
32
-
33
-
 34
34 -
 35
35 -
 36
36 -
 37
37 -
 38
38 -
 39
39 -
 40
40 -
 41
41 -
 42
42 -
 43
43 -
 44
44 -
45
-
46
-
47
-
48
-
49
-
50
-
51
-
52
-
53
-
54
-
55
-
56
-
57
-
58
-
59
-
60
-
61
-
62
-
63
-
64
-
65
-
66
-
67
-
68
-
69
-
70
-
71
-
72
-
73
-
74
-
75
-
76
-
77
-
78
-
79
-
80
-
81
-
82
-
83
-
84
-
85
-
86
-
87
-
88
-
89
-
90
-
91
-
92
-
93
-
94
-
95
-
96
-
97
-
98
-
99
-
100
-
101
 |
 |
