Sony PDWU2 User Manual (PDW-U2 Professional Disc Drive Unit Operation Manual ( - Page 41
Write-Protecting, Discs, Loading and, Unloading Discs, To Eject Discs with, the Unit Powered Off
 |
View all Sony PDWU2 manuals
Add to My Manuals
Save this manual to your list of manuals |
Page 41 highlights
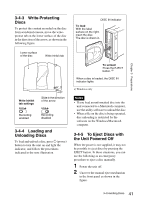
Chapter 3 Preparations 3-4-3 Write-Protecting Discs To protect the content recorded on the disc from accidental erasure, move the writeprotect tab on the lower surface of the disc in the direction of the arrow, as shown in the following figure. DISC IN indicator To load With the label surface on the right, insert the disc. The disc is drawn in. Lower surface of the disc Write Inhibit tab Write Inhibit tab settings Slide in the direction of the arrow Recording enabled Recording disabled 3-4-4 Loading and Unloading Discs To load and unload a disc, press 1 (power) button to turn the unit on and light the indicator, and follow the procedures indicated in the next illustration. To unload Press the EJECT button. a) When a disc is loaded, the DISC IN indicator lights. a) Windows only Notes • If you load an unformatted disc into the unit connected to a Macintosh computer, use the utility software to unload the disc. • When a file on the disc is being operated, disc unloading is restricted by the software on the Windows/Macintosh computer. 3-4-5 To Eject Discs with the Unit Powered Off When the power is not supplied, it may not be possible to eject discs by pressing the EJECT button. In these situations, you can use the following as an emergency procedure to eject a disc manually. 1 Power the unit off. 2 Uncover the manual eject mechanism in the front panel as shown in the figure. 41 3-4 Handling Discs
-
 1
1 -
2
-
3
-
4
-
5
-
6
-
7
-
8
-
9
-
10
-
11
-
12
-
13
-
14
-
15
-
16
-
17
-
18
-
19
-
20
-
21
-
22
-
23
-
24
-
25
-
26
-
27
-
28
-
29
-
30
-
31
-
32
-
33
-
34
-
35
-
 36
36 -
 37
37 -
 38
38 -
 39
39 -
 40
40 -
 41
41 -
 42
42 -
 43
43 -
 44
44 -
 45
45 -
 46
46 -
47
-
48
-
49
-
50
 |
 |
