Sony PSLX350H Primary User Manual
Sony PSLX350H - Stereo Turntable System Manual
 |
UPC - 027242543195
View all Sony PSLX350H manuals
Add to My Manuals
Save this manual to your list of manuals |
Sony PSLX350H manual content summary:
- Sony PSLX350H | Primary User Manual - Page 1
3-864-750-11(1) Stereo Turntable System Operating Instructions PS-LX350H © 1998 by Sony Corporation 1 - Sony PSLX350H | Primary User Manual - Page 2
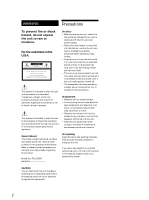
product. Model No. PS-LX350H Serial No. On repacking Keep the carton and packing materials. They provide an ideal container to transport the unit. If you have any question or problem concerning your unit that is not covered in this manual, please consult your nearest Sony dealer. CAUTION You are - Sony PSLX350H | Primary User Manual - Page 3
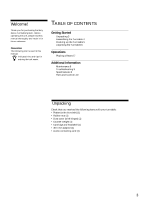
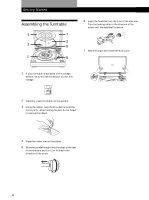
Information Maintenance 8 Troubleshooting 9 Specifications 9 Parts and Controls 10 Unpacking Check that you received the following items with your turntable: • Platter (with drive belt) (1) • Rubber mat (1) • Dust cover (with hinges) (1) • Counter weight (1) • Cartridge and headshell (1) • 45 r/min - Sony PSLX350H | Primary User Manual - Page 4
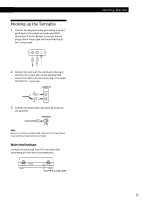
the front of the tone arm. Turn the locking collar in the direction of the arrow until the headshell is secure. 7 Rise the hinges and install the dust cover. 1 If your turntable is equipped with a voltage selector, be sure to set the selector to your line voltage. 110V·120V 220V·240V 2 Carefully - Sony PSLX350H | Primary User Manual - Page 5
terminals on the amplifier. Amplifier Note Be sure to connect the earth lead. Failure to do so will result in a humming noise from the turntable. Mains lead hookups Connect the mains lead to an AC wall outlet after completing all of the previous connections. / to a wall outlet Getting Started - Sony PSLX350H | Primary User Manual - Page 6
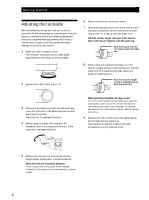
the height of the turntable. 2 Set the ANTI-SKATING dial to "0". NTI-SKATI 0 3 Remove the protective cover from the cartridge, move the tone arm to the space between the arm stand and the platter. Take care not to damage the stylus. 4 While using the finger lift to support the headshell, shift the - Sony PSLX350H | Primary User Manual - Page 7
strobo dots appear to stand still. Note When the unit is turned on, the speed is automatically set to 33 r/min. If you have an extra headshell, retain it in the headshell holder. 5 Remove the protective cover from the cartridge and disengage the arm stopper. 6 Shift the cueing lever forward. Move - Sony PSLX350H | Primary User Manual - Page 8
to moisten the stylus too much. To replace the stylus 1 Turn off the turntable and amplifier. 2 Turn the locking collar and remove the cartridge from the tone arm. 3 Grasp the stylus holder and pull it away from the body of the cartridge in the slanting direction. 4 Insert the new stylus by pushing - Sony PSLX350H | Primary User Manual - Page 9
11/16 x 5 11/16 x 13 3/4 in) (w/h/d) 6.5 kg (14 lb 5 oz) Supplied Accessories 45 r/min adaptor (1) Platter (with drive belt) (1) Rubber mat (1) Cartridge and headshell (1) Counter weight (1) Audio connecting cord (1) Dust cover (1) Design and specifications are subject to change without notice. 9 - Sony PSLX350H | Primary User Manual - Page 10
Additional Information Parts and Controls 1 45 r/min adaptor 2 Spindle 3 Strobo lamp and POWER button 4 START/STOP button 5 Rubber mat 6 Platter 7 Cartridge and headshell 8 SPEED button 9 Insulator 1 2 3 4 5 6 7 8 9 !º Dust cover !¡ Counter weight !™ Hinge !£ ANTI-SKATING dial !¢ Headshell holder - Sony PSLX350H | Primary User Manual - Page 11
11 - Sony PSLX350H | Primary User Manual - Page 12
12Sony Corporation Printed in Taiwan
-
 1
1 -
 2
2 -
 3
3 -
 4
4 -
 5
5 -
 6
6 -
 7
7 -
8
-
9
-
10
-
11
-
12
 |
 |

Operating Instructions
©
1998 by Sony Corporation
3-864-750-
11
(1)
PS-LX350H
Stereo
Turntable System