Sony PSLX350H Primary User Manual - Page 6
Adjusting the Turntable, Getting Started
 |
UPC - 027242543195
View all Sony PSLX350H manuals
Add to My Manuals
Save this manual to your list of manuals |
Page 6 highlights
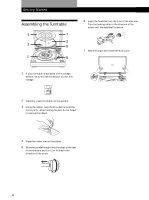
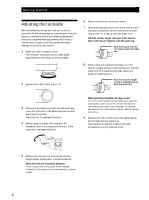
Getting Started 1 A 2 3 Adjusting the turntable Before attempting to play any records, be sure to complete the following steps to insure proper tone arm balance, tracking force and anti-skating adjustment. Failure to complete these adjustments will result in inferior sound quality and may cause permanent damage to the stylus and record. 1 Make sure the turntable is level. The insulator feet allow you to make slight adjustments to the height of the turntable. 2 Set the ANTI-SKATING dial to "0". NTI-SKATI 0 3 Remove the protective cover from the cartridge, move the tone arm to the space between the arm stand and the platter. Take care not to damage the stylus. 4 While using the finger lift to support the headshell, shift the cueing lever forward. Take care not to damage the stylus. 6 Return the tone arm to the arm stand. 7 Since the tracking force is zero when the tone arm is properly balanced, set the tracking force scale ring so that "0" lines up with the index line. Hold the counter weight with your other hand so that it will not turn together with the scale ring. Turn this ring so that the "0" lines up with the index line. 8 When using the supplied cartridge, turn the counter weight so that 2 reading lines up with the index line. The supplied cartridge requires 2 grams of tracking force. Turn the counter weight so that 2 reading lines up with the index line. When optionally available cartridge is used Turn the counter weight counterclockwise to align the tracking force scale ring to the correct tracking force. The tracking force scale ring is marked in 0.1 g steps and one full turn of the counter weight yields a tracking force of 4 g. 9 Set the ANTI-SKATING dial to the same setting as the tracking force scale ring. The numbers on the ANTI-SKATING dial correspond to 1 g of tracking force. T NG 4 -SKA I 0 NG 1 2 3 ANT I 4 5 Balance the tone arm by turning the counter weight either clockwise or counterclockwise. When the tone arm is properly balanced It will float parallel to the platter when released. It should not tilt toward either the headshell or counter weight. 6
-
 1
1 -
 2
2 -
 3
3 -
 4
4 -
 5
5 -
 6
6 -
 7
7 -
 8
8 -
 9
9 -
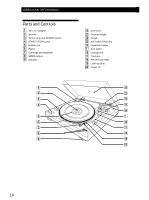 10
10 -
 11
11 -
 12
12
 |
 |