Sony SAVA-D900 Operating Instructions (primary manual) - Page 14
Turning the Speaker System On and Off 14, Turning on/ off the speaker system - surround sound system
 |
View all Sony SAVA-D900 manuals
Add to My Manuals
Save this manual to your list of manuals |
Page 14 highlights
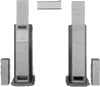
Getting Started Speaker System Hookup Mounting brackets If you wish to hang the rear speakers on a wall with hooks (not supplied), use the supplied black wood screws to attach the supplied mounting brackets to the upper part of the back panel of each rear speaker. Mounting bracket Turning the Speaker System On and Off ?/1 ?/1 123 456 789 >10 100 Black wood screw Rear speaker Notes • You are responsible for the proper selection and use of mounting hardware that you purchase at hardware stores, and for the proper and safe mounting of the speakers. • Each satellite speaker has a corresponding position for optimum sound effect. Before attaching the mounting brackets, see "Positioning the center and rear speakers for better surround sound effect" on page 16. Turning on/ off the speaker system Press ?/1. After connecting all the components, speakers, and AC power cord, output a test tone to check that all the speakers are connected correctly. For details on outputting a test tone, see page 18. If no sound is heard from a speaker while outputting a test tone or a test tone is output from a speaker other than the one whose name is currently displayed on the front panel display, check the speaker connection again. About the dummy disc A dummy disc is placed in the DISC 1 tray at shipment to prevent damage to the system during transportation. Before using the system for the first time, remove the dummy disc following the steps below. 1 Press ?/1 to turn on the system. 2 Press A of DISC 1 and remove the dummy disc from the disc tray. 3 Press A to close the disc tray. Notes on the dummy disc • You must use the dummy disc for protection when transporting the system. Be sure to keep the dummy disc in a secure place. (page 6) • There are no signals recorded on the dummy disc. 14
-
 1
1 -
2
-
3
-
4
-
5
-
6
-
7
-
8
-
 9
9 -
 10
10 -
 11
11 -
 12
12 -
 13
13 -
 14
14 -
 15
15 -
 16
16 -
 17
17 -
 18
18 -
 19
19 -
20
-
21
-
22
-
23
-
24
-
25
-
26
-
27
-
28
-
29
-
30
-
31
-
32
-
33
-
34
-
35
-
36
-
37
-
38
-
39
-
40
-
41
-
42
-
43
-
44
-
45
-
46
-
47
-
48
-
49
-
50
-
51
-
52
-
53
-
54
-
55
-
56
-
57
-
58
-
59
-
60
-
61
-
62
-
63
-
64
-
65
-
66
-
67
-
68
-
69
-
70
-
71
-
72
-
73
-
74
-
75
-
76
-
77
-
78
-
79
-
80
 |
 |
