Sony SRPC5 Product Manual (SRMASTER: SRPC4 / SRPC5 Operation Manual) - Page 11
Setup, Setup Flow, Preparation, Shared File Server Settings, Displaying the Web Application Screen
 |
View all Sony SRPC5 manuals
Add to My Manuals
Save this manual to your list of manuals |
Page 11 highlights
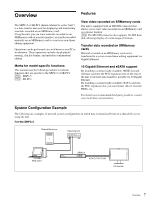
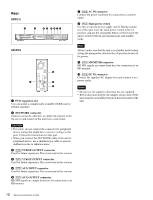
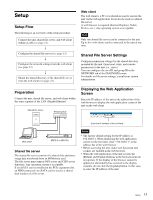
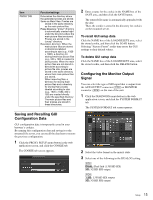
Setup Setup Flow The following is an overview of the setup procedure. Connect the unit, shared file server, and web client within a LAN (see page 11). r Configure the shared file server (see page 11). r Configure the network settings from the web client (see page 12). r Mount the shared directory of the shared file server from the web client (see page 12). Web client The web client is a PC or workstation used to operate the unit via the web application. It can also be used as a shared file server. A web browser is required (Internet Explorer, Safari, Firefox, etc.). Any operating system is acceptable. Note Only one shared file server can be connected to the unit. Up to five web clients can be connected to the unit at one time. Shared File Server Settings Configure permission settings for the shared directory mounted by the unit. Grant read, write, and execute permissions to the unit (i.e., users). You can configure the user ID and group ID in the NETWORK tab of the DIAGNOSIS menu. For details on file server settings, consult your system administrator. Preparation Connect the unit, shared file server, and web client within the same segment of the LAN (Gigabit Ethernet). Shared file server Switching hub Displaying the Web Application Screen Enter the IP address of the unit in the address bar of the web browser to display the web application screen of the unit on the web client. Enter the IP address of the unit here. Web client SRPC-5 or SR-PC4 Shared file server The shared file server consists of a shared disk and stores image data transferred from an SRMemory card. The file server must support NFS server and CIFS server functions. Any operating system is acceptable. If an eSATA card is installed in the PCIe expansion slot, an HDD connected via eSATA can be used as a shared disk in place of a file server. Notes • The factory default setting for the IP address is 192.168.0.1. When displaying the web application screen for the first time, enter "192.168.0.1" in the address bar of the web browser. • Before accessing the unit, make sure Javascript and cookies are enabled in the web browser. • When the web application of the unit is used, the [Return] and [Update] buttons in the browser menu do not operate. If the display of the browser cannot be updated or abnormality has occurred in the display contents, do not click the [Update] button. In this case, re-enter the IP address of the unit. Setup 11
-
 1
1 -
2
-
3
-
4
-
5
-
 6
6 -
 7
7 -
 8
8 -
 9
9 -
 10
10 -
 11
11 -
 12
12 -
 13
13 -
 14
14 -
 15
15 -
 16
16 -
17
-
18
-
19
-
20
-
21
-
22
-
23
-
24
-
25
-
26
-
27
-
28
-
29
-
30
-
31
 |
 |