Sony SS-CNP700 Operating Instructions - Page 47
Other Operation, Switching the audio input mode (INPUT MODE), Naming inputs
 |
View all Sony SS-CNP700 manuals
Add to My Manuals
Save this manual to your list of manuals |
Page 47 highlights
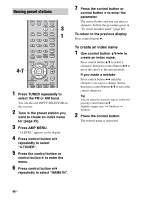
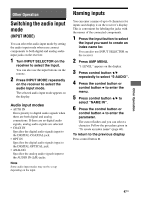
Other Operation Other Operation Switching the audio input mode (INPUT MODE) You can select the audio input mode by setting the audio input mode when you connect components to both digital and analog audio input jacks on the receiver. 1 Turn INPUT SELECTOR on the receiver to select the input. You can also use the input buttons on the remote. 2 Press INPUT MODE repeatedly on the receiver to select the audio input mode. The selected audio input mode appears on the display. Audio input modes • AUTO IN Gives priority to digital audio signals when there are both digital and analog connections. If there are no digital audio signals, analog audio signals are selected. • COAX IN Specifies the digital audio signals input to the DIGITAL COAXIAL jack. • OPT IN Specifies the digital audio signals input to the DIGITAL OPTICAL jack. • ANALOG Specifies the analog audio signals input to the AUDIO IN (L/R) jacks. Note Some audio input modes may not be set up depending on the input. Naming inputs You can enter a name of up to 8 characters for inputs and display it on the receiver's display. This is convenient for labeling the jacks with the names of the connected components. 1 Press the input button to select the input you want to create an index name for. You can also use INPUT SELECTOR on the receiver. 2 Press AMP MENU. "1-LEVEL" appears on the display. 3 Press control button V/v repeatedly to select "5-AUDIO". 4 Press the control button or control button b to enter the menu. 5 Press control button V/v to select "NAME IN". 6 Press the control button or control button b to enter the parameter. The cursor flashes and you can select a character. Follow the procedure given in "To create an index name" (page 46). To return to the previous display Press control button B. 47US
-
 1
1 -
2
-
3
-
4
-
5
-
6
-
7
-
8
-
9
-
10
-
11
-
12
-
13
-
14
-
15
-
16
-
17
-
18
-
19
-
20
-
21
-
22
-
23
-
24
-
25
-
26
-
27
-
28
-
29
-
30
-
31
-
32
-
33
-
34
-
35
-
36
-
37
-
38
-
39
-
40
-
41
-
 42
42 -
 43
43 -
 44
44 -
 45
45 -
 46
46 -
 47
47 -
 48
48 -
 49
49 -
 50
50 -
 51
51 -
 52
52 -
53
-
54
-
55
-
56
-
57
-
58
-
59
-
60
 |
 |