Sony STR-DA3200ES Operating Instructions (Large File - 16.41 MB) - Page 67
Settings for the video (Video Settings menu), Video Settings menu
 |
UPC - 027242687684
View all Sony STR-DA3200ES manuals
Add to My Manuals
Save this manual to your list of manuals |
Page 67 highlights
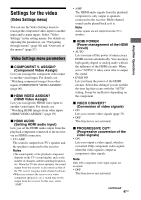
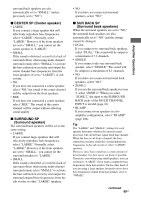
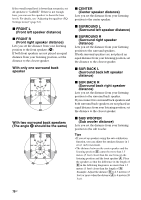
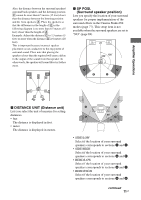
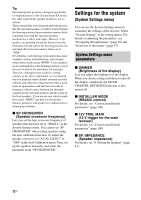
Settings for the video (Video Settings menu) You can use the Video Settings menu to reassign the component video input to another input and to name inputs. Select "Video Settings" in the setting menus. For details on adjusting the parameters, see "Navigating through menus" (page 56) and "Overview of the menus" (page 57). Video Settings menu parameters x COMPONENT V. ASSIGN? (Component Video Assign) Lets you reassign the component video input to another visual input. For details, see "Watching component images from other inputs (COMPONENT VIDEO ASSIGN)" (page 96). x HDMI VIDEO ASSIGN? (HDMI Video Assign) Lets you reassign the HDMI video input to another visual input. For details, see "Watching HDMI images from other inputs (HDMI VIDEO ASSIGN)" (page 95). x HDMI AUDIO (Setting HDMI audio input) Lets you set the HDMI audio output from the playback component connected to the receiver via an HDMI connection. • TV+AMP The sound is output from TV's speaker and the speakers connected to the receiver. Notes • The sound quality of the playback component depends on the TV's sound quality, such as the number of channels, and the sampling frequency, etc. When the TV has stereo speakers, the sound output from the receiver is also stereo as that of the TV, even if you play multi-channel software. • When you connect the receiver to a video component (projector, etc.), sound may not be output from the receiver. In this case, select "AMP." • AMP The HDMI audio signals from the playback component is only output to speakers connected to the receiver. Multi-channel sound can be played back as it is. Note Audio signals are not output from the TV's speakers. x HDMI POWER (Power management of the HDMI circuit) • AUTO Lets you turn off the power of unnecessary HDMI circuits automatically. You can enjoy high quality digital or analog audio without the influence of the HDMI circuits. When set to "AUTO," it takes some time to output the sound. • EVER ON Lets you keep the power of the HDMI circuits. Select this setting if you do not like the time lag that occurs with the "AUTO" setting. It may be ineffective depending on the component. x VIDEO CONVERT* (Conversion of video signals) • ON Lets you convert video signals (page 35). • OFF This function is not activated. x PROGRESSIVE OUT* (Progressive conversion of the video signals) • ON Lets you output a video signal, which is converted 480p component video signals when the video signal is output as component video signals. Note Only 480i component video input signals are accepted. • OFF This function is not activated. continued 67GB Amplifier Operations
-
 1
1 -
2
-
3
-
4
-
5
-
6
-
7
-
8
-
9
-
10
-
11
-
12
-
13
-
14
-
15
-
16
-
17
-
18
-
19
-
20
-
21
-
22
-
23
-
24
-
25
-
26
-
27
-
28
-
29
-
30
-
31
-
32
-
33
-
34
-
35
-
36
-
37
-
38
-
39
-
40
-
41
-
42
-
43
-
44
-
45
-
46
-
47
-
48
-
49
-
50
-
51
-
52
-
53
-
54
-
55
-
56
-
57
-
58
-
59
-
60
-
61
-
 62
62 -
 63
63 -
 64
64 -
 65
65 -
 66
66 -
 67
67 -
 68
68 -
 69
69 -
 70
70 -
 71
71 -
 72
72 -
73
-
74
-
75
-
76
-
77
-
78
-
79
-
80
-
81
-
82
-
83
-
84
-
85
-
86
-
87
-
88
-
89
-
90
-
91
-
92
-
93
-
94
-
95
-
96
-
97
-
98
-
99
-
100
-
101
-
102
-
103
-
104
-
105
-
106
-
107
-
108
-
109
-
110
-
111
-
112
-
113
-
114
-
115
-
116
-
117
-
118
-
119
-
120
-
121
-
122
-
123
-
124
-
125
-
126
-
127
-
128
-
129
-
130
-
131
-
132
-
133
-
134
-
135
-
136
-
137
-
138
-
139
-
140
-
141
-
142
-
143
-
144
-
145
-
146
-
147
-
148
-
149
-
150
-
151
-
152
-
153
-
154
-
155
-
156
-
157
-
158
-
159
-
160
-
161
-
162
-
163
-
164
-
165
-
166
-
167
-
168
-
169
-
170
-
171
-
172
-
173
-
174
-
175
-
176
-
177
-
178
-
179
-
180
-
181
-
182
-
183
-
184
-
185
-
186
-
187
-
188
-
189
-
190
-
191
-
192
-
193
-
194
-
195
-
196
-
197
-
198
-
199
-
200
-
201
-
202
-
203
-
204
-
205
-
206
-
207
-
208
-
209
-
210
-
211
-
212
-
213
-
214
-
215
-
216
-
217
-
218
-
219
-
220
-
221
-
222
-
223
-
224
-
225
-
226
-
227
-
228
-
229
-
230
-
231
-
232
-
233
-
234
-
235
-
236
-
237
-
238
-
239
-
240
-
241
-
242
-
243
-
244
-
245
-
246
-
247
-
248
-
249
-
250
-
251
-
252
-
253
-
254
-
255
-
256
-
257
-
258
-
259
-
260
-
261
-
262
-
263
 |
 |
