Sony SU-LW1 Instructions (SU-LW1 Wall-Mount Bracket) - Page 17
Connect the supplied power cord, and cables.
 |
View all Sony SU-LW1 manuals
Add to My Manuals
Save this manual to your list of manuals |
Page 17 highlights
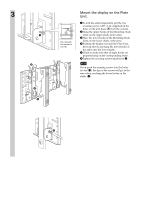
2 Hole for cable routing Connect the supplied power cord and cables. Connect the power cord and cables to the corresponding jacks on the rear of the display. For details on the cable connection, see the Operating Instructions for your display. When routing cables in a wall, pass the cables through a hole made in the wall for cable routing (10 (US)). Notes • You cannot connect the cables to the display after installing it on the Plate Unit. • Subcontract the cable routing in the wall to qualified contractors. 17 (US)
-
 1
1 -
2
-
3
-
4
-
5
-
6
-
7
-
8
-
9
-
10
-
11
-
 12
12 -
 13
13 -
 14
14 -
 15
15 -
 16
16 -
 17
17 -
 18
18 -
 19
19 -
 20
20 -
 21
21 -
 22
22 -
23
-
24
-
25
-
26
-
27
-
28
-
29
-
30
-
31
-
32
-
33
-
34
-
35
-
36
-
37
-
38
-
39
-
40
-
41
-
42
-
43
-
44
-
45
-
46
-
47
-
48
-
49
-
50
-
51
-
52
-
53
-
54
-
55
-
56
-
57
-
58
-
59
-
60
-
61
-
62
-
63
-
64
 |
 |

17
(US)
2
Connect the supplied power cord
and cables.
Connect the power cord and cables to the
corresponding jacks on the rear of the display. For
details on the cable connection, see the Operating
Instructions for your display.
When routing cables in a wall, pass the cables through
a hole made in the wall for cable routing (10 (US)).
Notes
•
You cannot connect the cables to the display after
installing it on the Plate Unit.
•
Subcontract the cable routing in the wall to
qualified contractors.
Hole for cable routing