Sony TDM-NC1 Operating Instructions (Large File - 10.48 MB) - Page 32
Making network settings manually, Restarting the network unit, Naming the unit (My Name function)
 |
UPC - 027242710900
View all Sony TDM-NC1 manuals
Add to My Manuals
Save this manual to your list of manuals |
Page 32 highlights
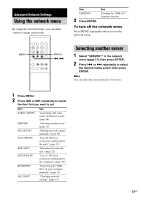
Making network settings manually By default the TDM-NC1 acquires an IP address automatically. Use the following procedure to specify an IP address, if necessary. Note that when the TDM-NC1 is used in an environment containing a router with DHCP, you should not need to specify the IP address of the TDM-NC1. 1 Select "NET SETUP?" in the network menu (page 31), then press ENTER. 2 Press . or > repeatedly until "NET TYPE?" appears, then press ENTER. 3 Press . or > repeatedly until "MANUAL?" appears, then press ENTER. "IP ADDRESS?" appears. 4 Press ENTER again. The currently set IP address appears. 5 Press . or > repeatedly to enter the numeric values of the IP address. Press m or M repeatedly to select the digit that you want to set. 6 Press ENTER. "SUBNET MASK?" appears. 7 Press ENTER again. The currently set subnet mask appears. 8 Press . or > repeatedly to enter the numeric values of the subnet mask. Press m or M repeatedly to select the digit that you want to set. 9 Press ENTER. "GATEWAY?" appears. 10 Press ENTER again. The current default gateway appears. 11 Press . or > repeatedly to enter the numeric values of the default gateway. Press m or M repeatedly to select the digit that you want to set. 12 Press ENTER. 13 Turn off the connected AV system with DIGITAL MEDIA PORT interface (Sony DAV series, etc.). 14 Turn on the connected AV system. To return to the automatic setting 1 Select "NET SETUP?" in the network menu (page 31), then press ENTER. 2 Press . or > repeatedly until "NET TYPE?" appears, then press ENTER. 3 Press . or > repeatedly until "AUTO?" appears, then press ENTER. 4 Turn off the connected AV system. 5 Turn on the connected AV system. Restarting the network unit Select "RESTART?" in the network menu (page 31), then press ENTER. Naming the unit (My Name function) You can name the units for identification. After naming a unit, the name will appear in the Mcrew Server. 1 Press MENU. 2 Press . / > until "NET SETUP?" appears, then press ENTER. 3 Press . / > until "MY NAME?" appears, then press ENTER. 4 Press . / > to select a desired name from the preset names, then press ENTER. Tip You can also create an original name. Refer to "Additional Information" (page 37). 32GB
-
 1
1 -
2
-
3
-
4
-
5
-
6
-
7
-
8
-
9
-
10
-
11
-
12
-
13
-
14
-
15
-
16
-
17
-
18
-
19
-
20
-
21
-
22
-
23
-
24
-
25
-
26
-
 27
27 -
 28
28 -
 29
29 -
 30
30 -
 31
31 -
 32
32 -
 33
33 -
 34
34 -
 35
35 -
 36
36 -
 37
37 -
38
-
39
-
40
-
41
-
42
-
43
-
44
-
45
-
46
-
47
-
48
-
49
-
50
-
51
-
52
-
53
-
54
-
55
-
56
-
57
-
58
-
59
-
60
-
61
-
62
-
63
-
64
-
65
-
66
-
67
-
68
-
69
-
70
-
71
-
72
-
73
-
74
-
75
-
76
-
77
-
78
-
79
-
80
-
81
-
82
-
83
-
84
-
85
-
86
-
87
-
88
-
89
-
90
-
91
-
92
-
93
-
94
-
95
-
96
-
97
-
98
-
99
-
100
-
101
-
102
-
103
-
104
-
105
-
106
-
107
-
108
-
109
-
110
-
111
-
112
-
113
-
114
-
115
-
116
-
117
-
118
-
119
-
120
-
121
-
122
-
123
-
124
-
125
-
126
-
127
-
128
-
129
-
130
-
131
-
132
-
133
-
134
-
135
-
136
-
137
-
138
-
139
-
140
-
141
-
142
-
143
-
144
-
145
-
146
-
147
-
148
-
149
-
150
-
151
-
152
-
153
-
154
-
155
-
156
-
157
-
158
-
159
-
160
-
161
-
162
-
163
-
164
-
165
-
166
-
167
-
168
-
169
-
170
-
171
-
172
-
173
-
174
-
175
-
176
-
177
-
178
-
179
-
180
-
181
-
182
-
183
-
184
-
185
-
186
-
187
-
188
-
189
-
190
-
191
-
192
-
193
-
194
-
195
-
196
-
197
-
198
-
199
-
200
-
201
-
202
-
203
-
204
-
205
-
206
-
207
-
208
-
209
-
210
-
211
-
212
-
213
-
214
-
215
-
216
-
217
-
218
-
219
-
220
-
221
-
222
-
223
-
224
-
225
-
226
-
227
-
228
-
229
-
230
-
231
-
232
-
233
-
234
-
235
-
236
-
237
-
238
-
239
-
240
-
241
-
242
-
243
-
244
-
245
-
246
-
247
-
248
-
249
-
250
-
251
-
252
-
253
-
254
-
255
-
256
-
257
-
258
-
259
-
260
-
261
-
262
-
263
-
264
-
265
-
266
-
267
-
268
-
269
-
270
-
271
-
272
-
273
-
274
-
275
-
276
-
277
-
278
-
279
-
280
-
281
-
282
-
283
-
284
-
285
-
286
-
287
-
288
-
289
-
290
-
291
-
292
-
293
-
294
-
295
-
296
-
297
-
298
-
299
-
300
-
301
-
302
-
303
-
304
-
305
-
306
-
307
-
308
-
309
-
310
-
311
-
312
-
313
-
314
-
315
-
316
-
317
-
318
-
319
-
320
-
321
-
322
-
323
-
324
-
325
-
326
-
327
-
328
-
329
-
330
-
331
-
332
-
333
-
334
-
335
-
336
-
337
-
338
-
339
-
340
-
341
-
342
-
343
-
344
-
345
-
346
-
347
-
348
-
349
-
350
-
351
-
352
-
353
-
354
-
355
-
356
-
357
-
358
-
359
-
360
-
361
-
362
-
363
-
364
-
365
-
366
-
367
-
368
-
369
-
370
-
371
-
372
-
373
-
374
-
375
-
376
-
377
-
378
-
379
-
380
-
381
-
382
-
383
-
384
-
385
-
386
-
387
-
388
-
389
-
390
-
391
-
392
-
393
-
394
-
395
-
396
-
397
-
398
-
399
-
400
-
401
-
402
-
403
-
404
-
405
-
406
-
407
-
408
-
409
-
410
-
411
-
412
-
413
-
414
-
415
-
416
-
417
-
418
-
419
-
420
-
421
-
422
-
423
-
424
-
425
-
426
-
427
-
428
-
429
-
430
-
431
-
432
-
433
-
434
-
435
-
436
-
437
-
438
-
439
-
440
-
441
-
442
-
443
-
444
-
445
-
446
-
447
-
448
-
449
-
450
-
451
-
452
-
453
-
454
-
455
-
456
-
457
-
458
-
459
-
460
-
461
-
462
-
463
-
464
-
465
-
466
-
467
 |
 |