Sony UP-27MD Operating Instructions - Page 12
SOURCE/MEMORY button, eject icon
 |
View all Sony UP-27MD manuals
Add to My Manuals
Save this manual to your list of manuals |
Page 12 highlights
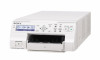
When the menu screen is displayed: The screen display is hidden when this button is pressed and held. Directional buttons Use these buttons to select menu items and change settings. STOP/CLEAR button (page 43) When printing is in progress: This button functions as the STOP button. Press this button during continuous printing operations to stop printing after the current item finishes printing. When printing is not in progress: This button functions as the CLEAR button. Press this button to delete images captured in memory. The images deleted when the button is pressed depend on the [Clear Button] setting in the [Function Setup] tab of the [User Setup] menu. If the button is pressed while the setting is [Off], an error tone will sound. MULTI PICTURE button (page 31) Repeatedly press this button during normal screen display to select the layout (full-size image, two reduced images, or four reduced images) in which images are captured to memory. Each press of this button displays the current image type for several seconds. [Multi Picture] in the [Print Setup] tab of the [User Setup] menu also changes in conjunction with each press of this button. PRINT QTY button (page 27) Repeatedly press this button to set the print quantity. You can select up to nine copies, and the current selection is displayed for a few seconds when the button is pressed. [Print Quantity] in the [Print Setup] tab of the [User Setup] menu also changes in conjunction with each press of this button. CAPTURE button Capture images to memory for printing. PRINT button Print the images that are captured to memory. POWER switch Use this switch to turn the printer on or off. Tray light Illuminates the output tray. Settings can be changed. For details, see "Setting the tray light" (page 73). Paper feed tray (page 20) Load paper in this tray. Printouts stack in the tray above. (eject) icon Press here to eject the paper feed tray. EXEC button Use to confirm a menu setting. MEMORY PAGE button (see pages 29, 30, 45) Select the appropriate memory page. SOURCE/MEMORY button Press this button to select the source for images that are output to the monitor. Each time you press this button, images are switched between the memory and input signal (source) images. Inside the ribbon door panel POWER switch Use this switch to turn the printer on or off. This switch turns the printer on or off even while the ribbon door panel is open. Ribbon tray (page 18) Load the ink ribbon in this tray. Dial (page 86) Use this dial to clear paper manually when an internal paper jam occurs. 12
-
 1
1 -
2
-
3
-
4
-
5
-
6
-
 7
7 -
 8
8 -
 9
9 -
 10
10 -
 11
11 -
 12
12 -
 13
13 -
 14
14 -
 15
15 -
 16
16 -
 17
17 -
18
-
19
-
20
-
21
-
22
-
23
-
24
-
25
-
26
-
27
-
28
-
29
-
30
-
31
-
32
-
33
-
34
-
35
-
36
-
37
-
38
-
39
-
40
-
41
-
42
-
43
-
44
-
45
-
46
-
47
-
48
-
49
-
50
-
51
-
52
-
53
-
54
-
55
-
56
-
57
-
58
-
59
-
60
-
61
-
62
-
63
-
64
-
65
-
66
-
67
-
68
-
69
-
70
-
71
-
72
-
73
-
74
-
75
-
76
-
77
-
78
-
79
-
80
-
81
-
82
-
83
-
84
-
85
-
86
-
87
-
88
-
89
-
90
 |
 |
