Sony VGC-LT17N User Guide - Page 117
for the procedure., Turn on all peripheral devices and then the computer.
 |
UPC - 027242725140
View all Sony VGC-LT17N manuals
Add to My Manuals
Save this manual to your list of manuals |
Page 117 highlights
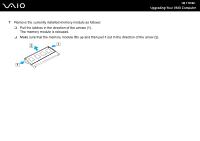
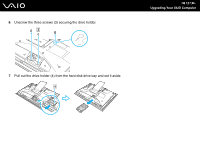
n 117 N Upgrading Your VAIO Computer 8 Remove the new memory module from its packaging. 9 Slide the memory module into the memory module slot and push it in until it clicks into place. ! Do not touch any other components on the motherboard. Be sure to insert the connector edge of the memory module into the slot while aligning the notch on the module with the small projection in the open slot. 10 Replace the memory module compartment cover and tighten the screw. 11 Connect the AC adapter and the peripheral devices that you disconnected in step 3. 12 Replace the back panel cover. See Removing and Replacing the Back Panel Cover (page 18) for the procedure. 13 Plug the computer to the power source and connect the rest of the peripheral devices. 14 Turn on all peripheral devices and then the computer.
-
 1
1 -
2
-
3
-
4
-
5
-
6
-
7
-
8
-
9
-
10
-
11
-
12
-
13
-
14
-
15
-
16
-
17
-
18
-
19
-
20
-
21
-
22
-
23
-
24
-
25
-
26
-
27
-
28
-
29
-
30
-
31
-
32
-
33
-
34
-
35
-
36
-
37
-
38
-
39
-
40
-
41
-
42
-
43
-
44
-
45
-
46
-
47
-
48
-
49
-
50
-
51
-
52
-
53
-
54
-
55
-
56
-
57
-
58
-
59
-
60
-
61
-
62
-
63
-
64
-
65
-
66
-
67
-
68
-
69
-
70
-
71
-
72
-
73
-
74
-
75
-
76
-
77
-
78
-
79
-
80
-
81
-
82
-
83
-
84
-
85
-
86
-
87
-
88
-
89
-
90
-
91
-
92
-
93
-
94
-
95
-
96
-
97
-
98
-
99
-
100
-
101
-
102
-
103
-
104
-
105
-
106
-
107
-
108
-
109
-
110
-
111
-
 112
112 -
 113
113 -
 114
114 -
 115
115 -
 116
116 -
 117
117 -
 118
118 -
 119
119 -
 120
120 -
 121
121 -
 122
122 -
123
-
124
-
125
-
126
-
127
-
128
-
129
-
130
-
131
-
132
-
133
-
134
-
135
-
136
-
137
-
138
-
139
-
140
-
141
-
142
-
143
-
144
-
145
-
146
-
147
-
148
-
149
-
150
-
151
-
152
-
153
-
154
-
155
-
156
-
157
-
158
-
159
-
160
-
161
-
162
-
163
-
164
-
165
-
166
-
167
-
168
-
169
-
170
-
171
-
172
-
173
-
174
-
175
-
176
-
177
-
178
-
179
-
180
-
181
-
182
-
183
-
184
-
185
-
186
-
187
-
188
-
189
-
190
-
191
 |
 |
