Sony VGC-RA940G VAIO User Guide - Page 21
To set up the wireless mouse
 |
View all Sony VGC-RA940G manuals
Add to My Manuals
Save this manual to your list of manuals |
Page 21 highlights
To set up the wireless mouse Insert two AA batteries (supplied) into the wireless mouse as shown. You can check the battery power level for your mouse by clicking (wireless mouse icon), located in the Windows® taskbar notification area. Do not mix old (used) and new batteries when replacing batteries in the wireless mouse. Always use the same type and manufacture of battery. Using incompatible batteries or mixing used/new batteries can damage the mouse. Inserting batteries into the wireless m ouse If your wireless mouse does not operate properly, the batteries may need to be replaced. When your wireless mouse is not being used for extended periods of time, remove the batteries to avoid possible damage from battery leakage. Page 21
-
 1
1 -
2
-
3
-
4
-
5
-
6
-
7
-
8
-
9
-
10
-
11
-
12
-
13
-
14
-
15
-
 16
16 -
 17
17 -
 18
18 -
 19
19 -
 20
20 -
 21
21 -
 22
22 -
 23
23 -
 24
24 -
 25
25 -
 26
26 -
27
-
28
-
29
-
30
-
31
-
32
-
33
-
34
-
35
-
36
-
37
-
38
-
39
-
40
-
41
-
42
-
43
-
44
-
45
-
46
-
47
-
48
-
49
-
50
-
51
-
52
-
53
-
54
-
55
-
56
-
57
-
58
-
59
-
60
-
61
-
62
-
63
-
64
-
65
-
66
-
67
-
68
-
69
-
70
-
71
-
72
-
73
-
74
-
75
-
76
-
77
-
78
-
79
-
80
-
81
-
82
-
83
-
84
-
85
-
86
-
87
-
88
-
89
-
90
-
91
-
92
-
93
-
94
-
95
-
96
-
97
-
98
-
99
-
100
-
101
-
102
-
103
-
104
-
105
-
106
-
107
-
108
-
109
-
110
-
111
-
112
-
113
-
114
-
115
-
116
-
117
-
118
-
119
-
120
-
121
-
122
-
123
-
124
-
125
-
126
-
127
-
128
-
129
-
130
-
131
-
132
-
133
-
134
-
135
-
136
-
137
-
138
-
139
-
140
-
141
-
142
-
143
-
144
-
145
-
146
-
147
-
148
-
149
-
150
-
151
-
152
-
153
-
154
-
155
-
156
-
157
-
158
-
159
-
160
-
161
-
162
-
163
-
164
-
165
-
166
-
167
-
168
-
169
-
170
-
171
-
172
-
173
-
174
-
175
-
176
-
177
-
178
-
179
-
180
-
181
-
182
-
183
-
184
-
185
-
186
-
187
-
188
-
189
-
190
-
191
-
192
-
193
-
194
-
195
-
196
-
197
-
198
-
199
-
200
-
201
-
202
-
203
-
204
-
205
-
206
-
207
-
208
-
209
-
210
-
211
-
212
-
213
-
214
-
215
-
216
-
217
-
218
-
219
-
220
-
221
-
222
-
223
-
224
-
225
-
226
-
227
-
228
-
229
-
230
-
231
-
232
-
233
-
234
-
235
-
236
-
237
-
238
-
239
-
240
-
241
-
242
-
243
-
244
-
245
-
246
-
247
-
248
-
249
-
250
-
251
-
252
-
253
-
254
-
255
-
256
-
257
-
258
-
259
-
260
-
261
-
262
-
263
-
264
-
265
-
266
-
267
-
268
-
269
-
270
-
271
 |
 |
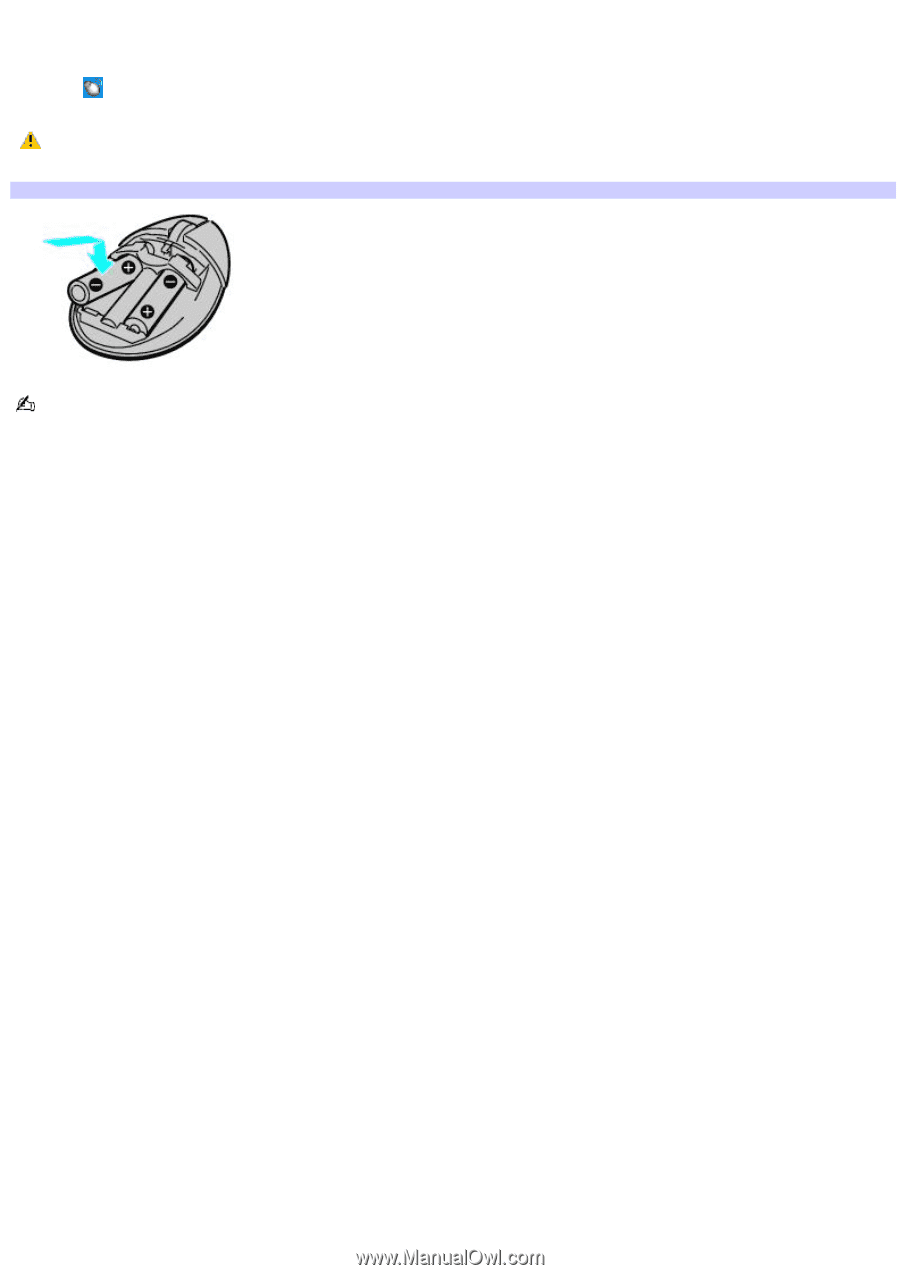
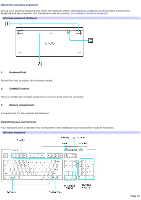
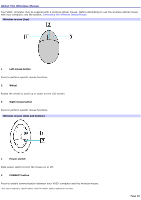
To set up the wireless mouse
Insert two AA batteries (supplied) into the wireless mouse as shown. You can check the battery power level for your mouse
by clicking
(wireless mouse icon), located in the Windows
®
taskbar notification area.
Do not mix old (used) and new batteries when replacing batteries in the wireless mouse. Always use the same
type and manufacture of battery. Using incompatible batteries or mixing used/new batteries can damage the mouse.
Inserting batteries into the wireless mouse
If your wireless mouse does not operate properly, the batteries may need to be replaced. When your wireless mouse
is not being used for extended periods of time, remove the batteries to avoid possible damage from battery leakage.
Page 21