Sony VGC-RB52 User Guide - Page 73
Computer Management, My Computer
 |
View all Sony VGC-RB52 manuals
Add to My Manuals
Save this manual to your list of manuals |
Page 73 highlights
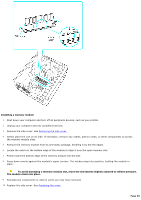
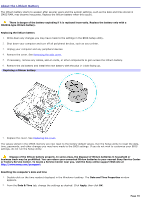
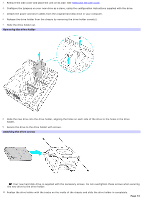
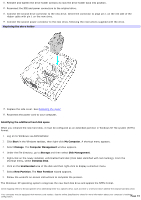
11. Reinsert and tighten the drive holder screw(s) to lock the drive holder back into position. 12. Reconnect the IDE and power connectors to the original drive. 13. Connect the second drive connector to the new drive. Orient the connector to align pin 1 on the red side of the ribbon cable with pin 1 on the new drive. 14. Connect the second power connector to the new drive, following the instructions supplied with the drive. Replacing the driv e holder 15. Replace the side cover. See Replacing the cover. 16. Reconnect the power cord to your computer. Identifying the additional hard disk space When you initialize the new hard disk, it must be configured as an extended partition in Windows NT file system (NTFS) format. 1. Log on to Windows® as Administrator. 2. Click Start in the Windows taskbar, then right-click My Computer. A shortcut menu appears. 3. Select Manage. The Computer Management window appears. 4. Under the file directory, go to Storage and then select Disk Management. 5. Right-click on the newly installed, unformatted hard disk (Disk label identified with red marking). From the shortcut menu, select Initialize Disk. 6. Click on the Unallocated area of the disk and then right-click to display a shortcut menu. 7. Select New Partition. The New Partition wizard appears. 8. Follow the wizard's on-screen instructions to complete the process. The Windows® XP operating system recognizes the new hard disk drive and applies the NTFS format. 1Drive mapping refers to the as s ignment of an identifying letter to a s pec ific drive, s uc h as Drive C or Drive D whic h identify the original hard dis k drive. 2Y our c omputer may be equipped with memory c ard readers . See the online Specifications s heet for more information about your c omputer's hardware c onfiguration. Page 73
-
 1
1 -
2
-
3
-
4
-
5
-
6
-
7
-
8
-
9
-
10
-
11
-
12
-
13
-
14
-
15
-
16
-
17
-
18
-
19
-
20
-
21
-
22
-
23
-
24
-
25
-
26
-
27
-
28
-
29
-
30
-
31
-
32
-
33
-
34
-
35
-
36
-
37
-
38
-
39
-
40
-
41
-
42
-
43
-
44
-
45
-
46
-
47
-
48
-
49
-
50
-
51
-
52
-
53
-
54
-
55
-
56
-
57
-
58
-
59
-
60
-
61
-
62
-
63
-
64
-
65
-
66
-
67
-
 68
68 -
 69
69 -
 70
70 -
 71
71 -
 72
72 -
 73
73 -
 74
74 -
 75
75 -
 76
76 -
 77
77 -
 78
78 -
79
-
80
-
81
-
82
-
83
-
84
-
85
-
86
-
87
-
88
-
89
-
90
-
91
-
92
-
93
-
94
-
95
-
96
-
97
-
98
-
99
-
100
-
101
-
102
-
103
-
104
-
105
-
106
-
107
-
108
-
109
-
110
-
111
-
112
-
113
-
114
-
115
-
116
-
117
-
118
-
119
-
120
-
121
-
122
-
123
-
124
-
125
-
126
-
127
-
128
-
129
-
130
-
131
 |
 |
