Sony VPCJ112FX VPCJ1 Series Hard Disk Drive Replacement Instructions - Page 2
VPCJ1 Series Hard Disk Drive, Replacement Instructions
 |
UPC - 027242799363
View all Sony VPCJ112FX manuals
Add to My Manuals
Save this manual to your list of manuals |
Page 2 highlights
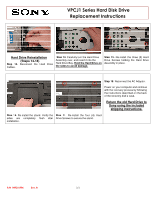
VPCJ1 Series Hard Disk Drive Replacement Instructions Lift To Remove Step 4. Using the enclosed magnetic screwdriver, loosen the three (3) screws securing the Hard Drive Assembly. These screws can not be completely removed. They will stay enclosed in the assembly. Step 5. Grasp the sides of the Hard Drive Assembly and lift. Do not completely remove the assembly at this step. Step 6. Carefully turn the Hard Drive Assembly over to disconnect the Data and Power Cables from the assembly. To release the Data Cable, push the metal tab and pull the Cable to the right. To release the Power Cable just pull to the right. Remove the assembly. Hard Drive Disassembly (Steps 7-12) Old Hard Drive Step 7. Identify the (4) side screws that secure the bracket to the Hard Drive. Step 8. Holding the edge of the Hard Drive, remove each screw. Put aside the Bracket Screws to secure the Bracket to the Hard Dive later in the procedure. Step 9. Set the old Hard Drive aside. New Hard Drive Step 10. Place the new Hard Drive next to the Hard Drive Bracket as shown. Step 11. Place the Hard Drive bracket over the new Hard Drive. Step 12. Re-install the four (4) Hard Drive Bracket screws to secure the Hard Drive bracket to the New Hard Drive. P/N 989201986 Rev. B 2/3
-
 1
1 -
 2
2 -
 3
3
 |
 |
