Sony VPCJ112FX VPCJ1 Series Hard Disk Drive Replacement Instructions - Page 3
Hard Drive Reinstallation, Steps 14-18, Return the old Hard Drive to, Sony using the included,
 |
UPC - 027242799363
View all Sony VPCJ112FX manuals
Add to My Manuals
Save this manual to your list of manuals |
Page 3 highlights
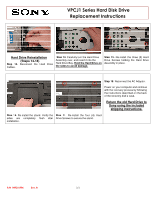
VPCJ1 Series Hard Disk Drive Replacement Instructions Hard Drive Reinstallation (Steps 14-18) Step 13. Reconnect the Hard Drive Cables. Step 14. Carefully turn the Hard Drive Assembly over, and insert it into the Hard Drive Bay. Hold the Hard Drive on the sides to avoid damage. Step 15. Re-install the three (3) Hard Drive Screws holding the Hard Drive Assembly in place. Step 18. Reconnect the AC Adaptor. Power on your computer and continue with the recovery process by following the instructions described on the back of the recovery disk's case. Return the old Hard Drive to Sony using the included shipping instructions. Step 16. Re-install the stand. Verify the Step 17. Re-install the four (4) Hard sides are completely flush after Drive Screws to secure the stand. installation. P/N 989201986 Rev. B 3/3
-
 1
1 -
 2
2 -
 3
3
 |
 |