Sony WAHT-SA20 Operating Instructions - Page 6
Unpacking, Hooking Up, Insert the wireless transceiver, supplied in the slot on the rear - speaker
 |
UPC - 027242782471
View all Sony WAHT-SA20 manuals
Add to My Manuals
Save this manual to your list of manuals |
Page 6 highlights
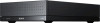
Unpacking Surround amplifier (TA-SA200WR) (1) Wireless transceiver (EZW-RT10/EZW-RT10A) (1) Speaker cords (2) Operating Instructions (1) Hooking Up Connect the surround amplifier to your S-AIR main unit. Before installing, make sure to remove the AC power cords (mains leads) of all S-AIR products from wall outlets (mains). 1 Insert the wireless transceiver (supplied) in the slot on the rear of the surround amplifier. Note • Do not touch the terminals of the wireless transceiver. • Match the direction of the V marks. • Do not insert anything other than the wireless transceiver into the EZW-RT10 slot. Rear panel of the surround amplifier EZW-RT10 6US
-
 1
1 -
 2
2 -
 3
3 -
 4
4 -
 5
5 -
 6
6 -
 7
7 -
 8
8 -
 9
9 -
 10
10 -
 11
11 -
 12
12 -
13
-
14
-
15
-
16
-
17
-
18
-
19
-
20
-
21
-
22
-
23
-
24
-
25
-
26
-
27
-
28
-
29
-
30
-
31
-
32
-
33
-
34
-
35
-
36
-
37
-
38
-
39
-
40
-
41
-
42
-
43
-
44
 |
 |

6
US
Surround amplifier
(TA-SA200WR) (1)
Wireless transceiver
(EZW-RT10/EZW-RT10A) (1)
Speaker cords (2)
Operating Instructions (1)
Connect the surround amplifier to your
S-AIR main unit.
Before installing, make sure to
remove the AC power cords
(mains leads) of all S-AIR
products from wall outlets
(mains).
1
Insert the wireless transceiver
(supplied) in the slot on the rear
of the surround amplifier.
Note
• Do not touch the terminals of the
wireless transceiver.
• Match the direction of the
V
marks.
• Do not insert anything other than the
wireless transceiver into the EZW-RT10
slot.
Unpacking
Hooking Up
EZW-RT10
Rear panel of the surround amplifier