Sony WI-C310 Help Guide - Page 10
Location and function of parts
 |
View all Sony WI-C310 manuals
Add to My Manuals
Save this manual to your list of manuals |
Page 10 highlights
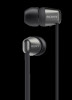
Help Guide Wireless Stereo Headset WI-C200 / WI-C310 Location and function of parts 1. Earbuds 2. Right unit The right unit has a (right) mark. Clasp the left and right units with the built-in magnet. 3. Left unit The left unit has a (left) mark. Clasp the left and right units with the built-in magnet. 4. Tactile dot The left unit has a tactile dot. 5. Indicator (blue/red) Lights up in red while charging. Lights up in red or blue to indicate the power or communication status of the headset. 6. Microphone Picks up the sound of your voice (when talking on the phone). 7. Built-in antenna A Bluetooth antenna is built into the headset. 8. +/ (volume +/next) button 9. / (power/play/call) button Operate to turn on/off the headset, play music, or make a call. 10. USB Type-C port Connect the headset to a computer or a commercially available USB AC adaptor with the supplied USB Type-C cable to charge the headset. 10
-
 1
1 -
2
-
3
-
4
-
 5
5 -
 6
6 -
 7
7 -
 8
8 -
 9
9 -
 10
10 -
 11
11 -
 12
12 -
 13
13 -
 14
14 -
 15
15 -
16
-
17
-
18
-
19
-
20
-
21
-
22
-
23
-
24
-
25
-
26
-
27
-
28
-
29
-
30
-
31
-
32
-
33
-
34
-
35
-
36
-
37
-
38
-
39
-
40
-
41
-
42
-
43
-
44
-
45
-
46
-
47
-
48
-
49
-
50
-
51
-
52
-
53
-
54
-
55
-
56
-
57
-
58
-
59
-
60
-
61
-
62
-
63
-
64
-
65
-
66
-
67
-
68
-
69
-
70
-
71
-
72
-
73
-
74
-
75
-
76
-
77
-
78
-
79
-
80
-
81
-
82
-
83
-
84
-
85
-
86
-
87
-
88
-
89
-
90
-
91
-
92
-
93
-
94
-
95
-
96
-
97
-
98
-
99
-
100
-
101
-
102
 |
 |
