Symphonic CD20 Owner's Manual - Page 7
Connections
 |
View all Symphonic CD20 manuals
Add to My Manuals
Save this manual to your list of manuals |
Page 7 highlights
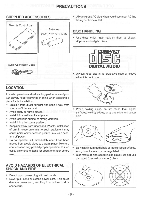
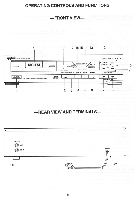
1. POWER button 10. SKIP Down button To turn unit on and off. Skip to previous track (music). 2. OPEN/CLOSE button 11. STOP button Press to open or close disc tray, when POWER is Press to stop play. on. 12. PLAY/PAUSE button 3. DISPLAY Selector button Press to start play. Press during play to suspend Selects desired display mode; TIME play. Press during pause to resume play. (Minute/Second) or TRACK NO. 13. PROGRAM (PROG.)/PLAY indicator 4. REPEAT button Lights during programming or programmed play. Selects repeat mode; one or all music repeat. 14. PLAY indicator 5. ENTER button Lights during play and flashes during pause. Press to store selections chosen by SKIP buttons in 15. DIGITAL DISPLAY (TRACK NO./MIN./SEC.) computer memory. Shows elapsed playing time or music track. 6. MEMORY button 16. ONE/REPEAT indicator Press to prepare for storing. Lights when one repeat function is on. 7. SEARCH Down button 17. ALL/REPEAT indicator Press and hold to search reverse at high speed Lights when all repeat function is on. during play. Skips five tracks down at stop mode. 18. REMOTE SENSOR 8. SEARCH Up button Receive the infrared signals from the remote-control Press and hold to search forward at high speed unit. during play. Skips five tracks up at stop mode. 19. DISC TRAY 9. SKIP Up button 20. LINE OUT Jacks Skip to next track (music). 21. AC Power Cord with plug CONNECTIONS 1 Using shielded stereo audio cables (with RCA type connectors), connect CD player outputs (LINE OUT) to CD or AUX input jacks on your amplifier/receiver. (White plug to left channel and red plug to right channel.) 2 Connect to the unit to a 120V AC, 60Hz Outlet. )( Do not connect CD player outputs to PHONO inputs. CD PLAYER White Red (4)) LA O Output cable White/ Power cord Red ® CD or AUX terminals r000000 Stereo Amplifier Household AC Outlet (AC 120V 60Hz) - 7 -
-
 1
1 -
 2
2 -
 3
3 -
 4
4 -
 5
5 -
 6
6 -
 7
7 -
 8
8 -
 9
9 -
 10
10 -
 11
11 -
 12
12 -
13
-
14
-
15
-
16
-
17
-
18
-
19
 |
 |
