Symphonic WF319E Owner's Manual - Page 10
SET UP FOR USE
 |
View all Symphonic WF319E manuals
Add to My Manuals
Save this manual to your list of manuals |
Page 10 highlights
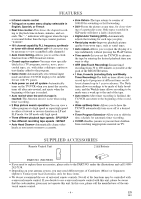
TO RECORD A SCRAMBLED/UNSCRAMBLED CHANNEL 1. Set the TV/VCR channel selector to the output channel of the Cable Converter Box or Satellite Box. (Ex. CH3) 2.Select the channel to record from your Cable Converter Box or Satellite Box. EXTERNAL INPUT MODE When using an external input signal (another VCR or video camera), connect the player's audio/video out- put cables to the AUDIO IN/ VIDEO IN jacks of your TV/VCR. Then press the CHANNEL K or L button until "AUX" appears on the screen. NOTE: "AUX" is found below the lowest memorized channel. (Example: CH2) AUX INSTALLING THE BATTERIES 1)Open the battery compartment cover by pressing the cover on the remote unit in the direction of the arrow. 2)Insert 2 "AA" penlight batteries into the battery compartment in the direction indicated by the polarity (+/-) markings. 3)Replace the cover. SET UP FOR USE SELECTING THE LANGUAGE 1 Plug in the TV/VCR power cord Plug the TV/VCR power cord into a standard AC outlet. NOTE: • If some digits appear in the corner of the screen, press the POWER button without unplugging the power cord. Make sure ... • Press the POWER button to turn on the TV/VCR. NOTE: This function effects only the language on the screen menu and not the audio source. 2 Select "LANGUAGE" Press the MENU button on the remote control. Press the PLAY/K or STOP/L button to point to "LANGUAGE". - M E N U - TIMER PROGRAMMING PICTURE CONTROL SETTING CLOCK CHANNEL SET UP USER'S SET UP V-CHIP SET UP B LANGUAGE [ENGLISH] CAPTION [OFF] ZERO RETURN TIME SEARCH 3 Select "ENGLISH", "ESPAÑOL" or "FRANÇAIS" Select "ENGLISH", "ESPAÑOL"= Spanish or "FRANÇAIS"= French using the F.FWD/B or REW/s button. 4 Exit the Language mode Press the MENU button on the remote control to return to TV mode. NOTE: If for some reason the menu is in Spanish or French, press the MENU button on the remote control, press the PLAY/K button to point to "IDIOMA [ESPAÑOL]" or "LANGAGE [FRANÇAIS]", then press the F.FWD/B button, then press the MENU button on the remote control. CLOCK SET UP (AUTO / MANUAL) The TV/VCR clock must be set correctly before VCR timer recording is possible. It is suggested that the clock be set manually when first setting up the TV/VCR. Then, set to [ON] the auto clock setting which will periodically correct the setting if necessary. NOTE: If you cannot receive a station with time signals, auto clock setting cannot be performed. Use manual setting only. MANUAL CLOCK SETTING Make sure ... • The TV/VCR is turned on. - 10 - EN 9I03
-
 1
1 -
2
-
3
-
4
-
 5
5 -
 6
6 -
 7
7 -
 8
8 -
 9
9 -
 10
10 -
 11
11 -
 12
12 -
 13
13 -
 14
14 -
 15
15 -
16
-
17
-
18
-
19
-
20
-
21
-
22
-
23
-
24
-
25
-
26
-
27
-
28
-
29
-
30
-
31
-
32
 |
 |
