TEAC RC-HS20PD RC-HS20PD owners manual - Page 7
Preparations
 |
View all TEAC RC-HS20PD manuals
Add to My Manuals
Save this manual to your list of manuals |
Page 7 highlights
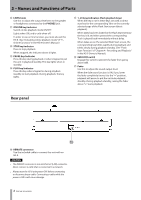
3 - Preparations Connecting to an HS-8 Use the included cable to connect the REMOTE connector on the rear panel of this unit with the HS-8's REMOTE connector. CAUTION •• The REMOTE connector is not an Ethernet (LAN) connector. Never connect a cable that is connected to a network to this unit or an HS-8. •• Always turn the HS-8 unit power OFF before connecting or disconnecting a cable. Connecting a cable while the power is ON could cause damage. Using the HS-8 SIGNAL GND terminal Depending on the operating conditions, flicker might appear on the color display of this unit or noise might be heard in the monitoring sound. Should this occur, use the SIGNAL GND terminal on the rear panel of the HS-8. (Please prepare a cable to connect to the SIGNAL GND terminal. No cable is provided with the unit.) Using a commercially-available cable Under ordinary circumstances, use the dedicated connection cable (5 m) that is included with the unit. If the included dedicated cable is not long enough or there is some other problem, use a commercially-available category 6 LAN cable with straight wiring. When doing so, however, make certain that the cable meets the following requirements. •• Always use a shielded cable. •• The maximum cable length is 10 m. Depending on the quality and length of the cable being used, static might appear on the color display or noise might be heard when monitoring. If this occurs, attach ferrite cores to the cable and the HS-8 power cord. Setting the HS-8 1 Make the following settings to the HS-8 unit as necessary. •• Online function If the online function is set to Enable, this unit's ON LINE key is enabled, and on line playback can be turned ON (on line playback) or OFF (monitor playback). If the on line function is set to Disable, this unit's ON LINE key is disabled, and sound is always output from all the output connectors. For details about setting the online function, see "Enabling online functions" of "9 - Online functions" in the HS-8 Owner's Manual. •• Play Mode Set the play mode as desired. In One Take mode, playback stops after playing a single take. In All Take mode, all the takes in the folder are played in succession. For details about play mode settings, see "GENERAL page" of "6 - Internal Settings and Operations" in the HS-8 Owner's Manual. 2 Select the folder to play. See "Loading folders" of "5 - Projects" in the HS-8 Owner's Manual. 7 TASCAM RC-HS20PD
-
 1
1 -
 2
2 -
 3
3 -
 4
4 -
 5
5 -
 6
6 -
 7
7 -
 8
8 -
 9
9 -
 10
10 -
 11
11 -
 12
12
 |
 |
