TP-Link Archer AX3200 Archer AX3200US V1 User Guide - Page 9
Back Panel and Side Panel, Button and Port Explanation
 |
View all TP-Link Archer AX3200 manuals
Add to My Manuals
Save this manual to your list of manuals |
Page 9 highlights
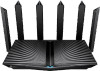
Chapter 1 Get to Know About Your Router Status Solid blue Pulsing blue Off Indication The router is working normally. The firmware is being upgraded, WPS connection is being established, or the router is being reset. Do not disconnect or power off your router. Power is off or the LED is turned off. 1. 2. 2. Back Panel and Side Panel The following parts (view from left to right) are located on the back panel. Button and Port Explanation Item Description USB 2.0 Port For connecting your USB storage devices to the router. Power Port For connecting the router to a power socket via the provided power adapter. Power On/Off Button Press this button to power on or off the router. Reset Button Press and hold the button until the LED blinks to reset the router to its factory default settings. 2.5 Gbps WAN/LAN Port* For connecting to your modem, the Ethernet outlet or other internet devices. Used as the WAN or LAN port. 1 Gbps WAN/LAN Port* For connecting to your modem, the Ethernet outlet or other internet devices. Used as the WAN or LAN port. LAN Port (1-3) For connecting your PC or other wired devices to the router. Note: The 2.5 Gbps WAN/LAN port and 1 Gbps WAN/LAN port cannot be used as the WAN port at the same time. If you choose to use 2.5 Gbps WAN/LAN port as the WAN port for internet service, the 1 Gbps WAN/LAN port will be used as LAN port by default. It's recommended to use 2.5 Gbps WAN/LAN port as the WAN port. 5
-
 1
1 -
2
-
3
-
 4
4 -
 5
5 -
 6
6 -
 7
7 -
 8
8 -
 9
9 -
 10
10 -
 11
11 -
 12
12 -
 13
13 -
 14
14 -
15
-
16
-
17
-
18
-
19
-
20
-
21
-
22
-
23
-
24
-
25
-
26
-
27
-
28
-
29
-
30
-
31
-
32
-
33
-
34
-
35
-
36
-
37
-
38
-
39
-
40
-
41
-
42
-
43
-
44
-
45
-
46
-
47
-
48
-
49
-
50
-
51
-
52
-
53
-
54
-
55
-
56
-
57
-
58
-
59
-
60
-
61
-
62
-
63
-
64
-
65
-
66
-
67
-
68
-
69
-
70
-
71
-
72
-
73
-
74
-
75
-
76
-
77
-
78
-
79
-
80
-
81
-
82
-
83
-
84
-
85
-
86
-
87
-
88
-
89
-
90
-
91
-
92
-
93
-
94
-
95
-
96
-
97
-
98
-
99
-
100
-
101
-
102
-
103
-
104
-
105
-
106
-
107
-
108
-
109
-
110
-
111
-
112
-
113
-
114
 |
 |
