TP-Link TD-8817 User Guide - Page 14
TD-8817, Step 4, Start, command, Enter - configuration
 |
UPC - 845973060107
View all TP-Link TD-8817 manuals
Add to My Manuals
Save this manual to your list of manuals |
Page 14 highlights
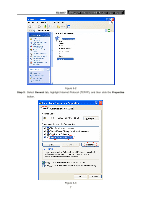
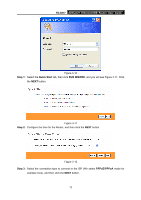
TD-8817 ADSL2/2+ Ethernet/USB Router User Guide Step 4: Configure the IP address as Figure 3-4 shows. After that, click OK. ) Note: Figure 3-4 You can configure the PC to get an IP address automatically, select "Obtain an IP address automatically" and "Obtain DNS server address automatically" in the screen above. Now, you can run the Ping command in the command prompt to verify the network connection. Please click the Start menu on your desktop, select run tab, type cmd or command in the field and press Enter. To continue, please type ping 192.168.1.1 on the following appeared command prompt screen and then press Enter. If the result displayed is similar to the screen below, the connection between your PC and the Router has been established. Figure 3-5 8
-
 1
1 -
2
-
3
-
4
-
5
-
6
-
7
-
8
-
 9
9 -
 10
10 -
 11
11 -
 12
12 -
 13
13 -
 14
14 -
 15
15 -
 16
16 -
 17
17 -
 18
18 -
 19
19 -
20
-
21
-
22
-
23
-
24
-
25
-
26
-
27
-
28
-
29
-
30
-
31
-
32
-
33
-
34
-
35
-
36
-
37
-
38
-
39
-
40
-
41
-
42
-
43
-
44
-
45
-
46
-
47
-
48
-
49
-
50
-
51
-
52
-
53
-
54
-
55
-
56
-
57
-
58
 |
 |
