TP-Link TD-W8101G User Guide - Page 26
LAN
 |
UPC - 845973060251
View all TP-Link TD-W8101G manuals
Add to My Manuals
Save this manual to your list of manuals |
Page 26 highlights
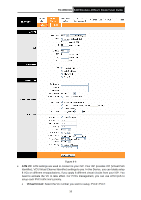
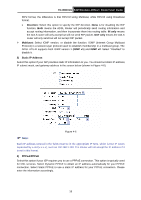
TD-W8101G 54M Wireless ADSL2+ Router User Guide ¾ Default Route: You should select Yes to configure the PVC as the default gateway to internet from this device. ¾ MAC Spoofing: Enable the MAC Spoofing, and enter a MAC address to configure the WAN port. It makes your inside network appear as a device with this MAC address to the outside world. 4) Bridge Mode If you select this type of connection, the modem can be configured to act as a bridging device between your LAN and your ISP. Bridges are devices that enable two or more networks to communicate as if they are two segments of the same physical LAN. Figure 4-8 ) Note: After you finish the Internet configuration, please click SAVE to make the settings take effect. 4.3.2 LAN Choose "Interface Setup→LAN" menu, and you will see the LAN screen (shown in Figure 4-9). Please configure the parameters for LAN ports according to the descriptions below. 20
-
 1
1 -
2
-
3
-
4
-
5
-
6
-
7
-
8
-
9
-
10
-
11
-
12
-
13
-
14
-
15
-
16
-
17
-
18
-
19
-
20
-
 21
21 -
 22
22 -
 23
23 -
 24
24 -
 25
25 -
 26
26 -
 27
27 -
 28
28 -
 29
29 -
 30
30 -
 31
31 -
32
-
33
-
34
-
35
-
36
-
37
-
38
-
39
-
40
-
41
-
42
-
43
-
44
-
45
-
46
-
47
-
48
-
49
-
50
-
51
-
52
-
53
-
54
-
55
-
56
-
57
-
58
-
59
-
60
 |
 |
