TP-Link TL-ER6120 TL-ER6120 User Guide - Page 42
Set the MAC Address for LAN port, Set the MAC Address for WAN port, Set the MAC Address for DMZ port
 |
View all TP-Link TL-ER6120 manuals
Add to My Manuals
Save this manual to your list of manuals |
Page 42 highlights
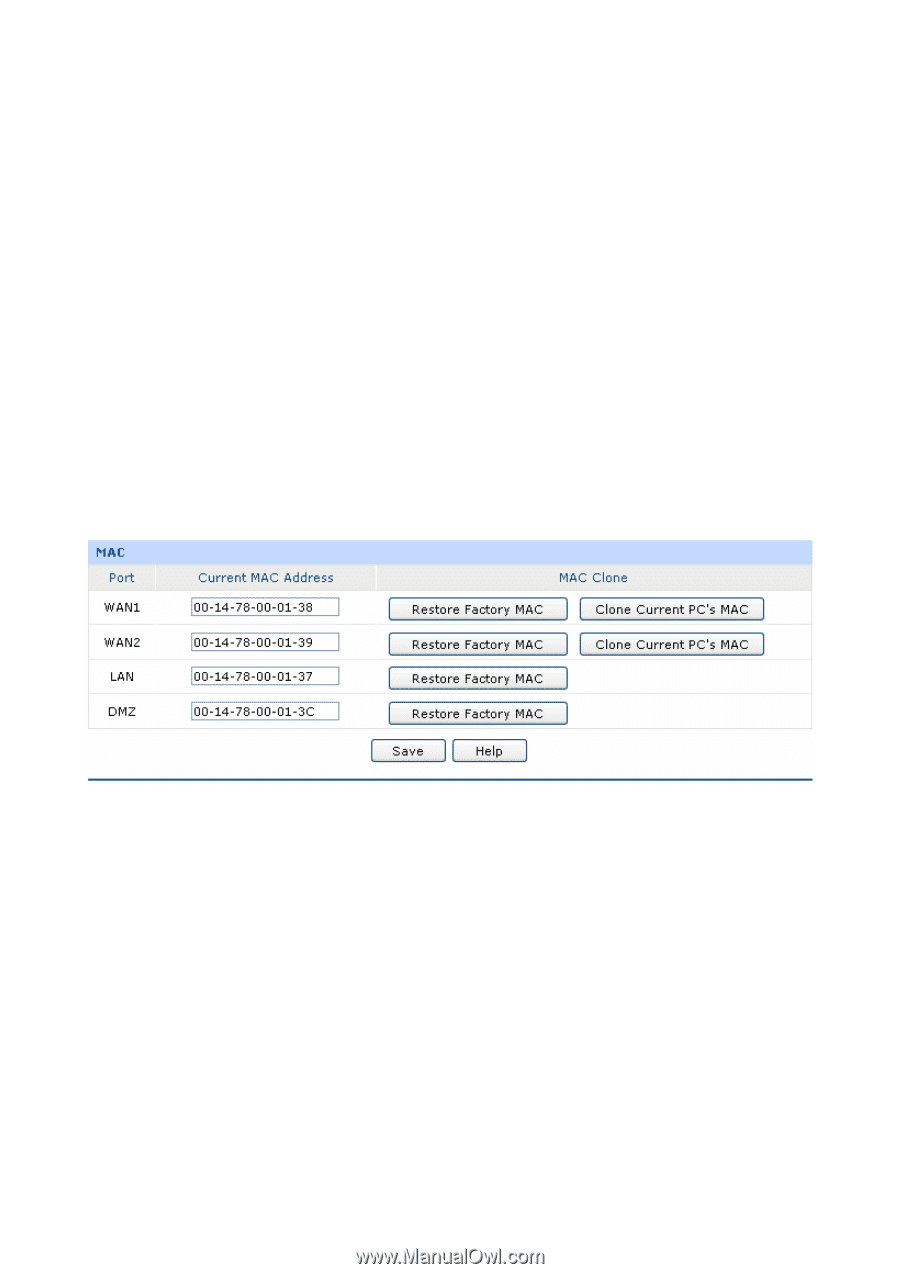
Set the MAC Address for LAN port: In a complex network topology with all the ARP bound devices, if you want to change to use TL-ER6120 instead of the current router in a network node, you can just set the MAC address of TL-ER6120 's LAN port the same to the MAC address of the previous router, which can avoid all the devices under this network node to update their ARP binding tables. Set the MAC Address for WAN port: In the condition that your ISP has bound the account and the MAC address of the dial-up device, if you want to change the dial-up device to be TL-ER6120, you can just set the MAC address of TL-ER6120's WAN port the same to the MAC address of the previous dial-up device for a normal Internet connection. Set the MAC Address for DMZ port: The application of MAC address for DMZ port is similar to that for LAN port. Choose the menu Network→MAC Address→MAC Address to load the following page. Figure 3-19 MAC Address The following items are displayed on this screen: ¾ MAC Address Port: Displays the port type of the Router. Current MAC Address: Displays the current MAC address of the port. MAC Clone: It's only available for WAN port. Click the button to restore the MAC address to the factory default value or click the
-
 1
1 -
2
-
3
-
4
-
5
-
6
-
7
-
8
-
9
-
10
-
11
-
12
-
13
-
14
-
15
-
16
-
17
-
18
-
19
-
20
-
21
-
22
-
23
-
24
-
25
-
26
-
27
-
28
-
29
-
30
-
31
-
32
-
33
-
34
-
35
-
36
-
 37
37 -
 38
38 -
 39
39 -
 40
40 -
 41
41 -
 42
42 -
 43
43 -
 44
44 -
 45
45 -
 46
46 -
 47
47 -
48
-
49
-
50
-
51
-
52
-
53
-
54
-
55
-
56
-
57
-
58
-
59
-
60
-
61
-
62
-
63
-
64
-
65
-
66
-
67
-
68
-
69
-
70
-
71
-
72
-
73
-
74
-
75
-
76
-
77
-
78
-
79
-
80
-
81
-
82
-
83
-
84
-
85
-
86
-
87
-
88
-
89
-
90
-
91
-
92
-
93
-
94
-
95
-
96
-
97
-
98
-
99
-
100
-
101
-
102
-
103
-
104
-
105
-
106
-
107
-
108
-
109
-
110
-
111
-
112
-
113
-
114
-
115
-
116
-
117
-
118
-
119
-
120
-
121
-
122
-
123
-
124
-
125
-
126
-
127
-
128
-
129
-
130
-
131
-
132
-
133
-
134
-
135
-
136
-
137
-
138
-
139
-
140
-
141
-
142
-
143
-
144
-
145
-
146
-
147
-
148
-
149
-
150
-
151
-
152
-
153
-
154
-
155
-
156
-
157
-
158
-
159
-
160
-
161
-
162
-
163
-
164
-
165
-
166
-
167
-
168
-
169
 |
 |