TP-Link TL-SL1117 TL-SL1117 V2 QIG 7106503252 - Page 6
Installation - 16
 |
View all TP-Link TL-SL1117 manuals
Add to My Manuals
Save this manual to your list of manuals |
Page 6 highlights
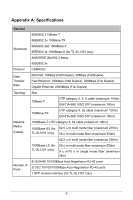
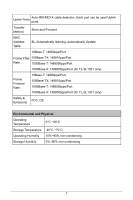
Uplink ports, and any port can be simply plugged into a server, a hub, a router or a switch, using the straight cable or crossover cable. Diagnostic LEDs which display link status and activity, allowing you to quickly detect and correct problems on the network. 1.2 Features ¾ Complies with IEEE802.3, IEEE802.3u, IEEE802.3ab, IEEE802.3z (for TLSL1351 only) standards ¾ 8/16/24/48 10/100Mbps Auto-Sense RJ45 ports supporting Auto-MDI/MDIX ¾ 2/1/2/2 10/100/1000Mbps Auto-Sense RJ45 ports supporting Auto-MDI/MDIX ¾ 1 SFP(Small Form Pluggable) module interface (For TL-SL1351 only) ¾ Supports Auto MDI / MDIX cable detection on all ports eliminate the need for crossover cable or Uplink port ¾ Non-blocking switching architecture that forwards and filters packets at full wire -speed for maximum throughput ¾ Supports MAC address auto-learning and auto-aging ¾ Supports IEEE802.3x flow control for full-duplex model and backpressure for half-duplex transfer model ¾ LED indicators for monitoring power, link, activity, speed ¾ Internal power supply Chapter 2 Installation 2.1 Mounting the Switch on a Desk Before place the Switch on a desk, attach four rubber footpads to the flutes on the Switch bottom, then lay the Switch on the desktop, where can be have as much as 5kg placed on top. Note: Make sure there is a grounded AC outlet within 1.5 meters, and working well. Make sure there is free space for radiating heat and air. Make sure not to place anything too heavy on top of the switch. 2
-
 1
1 -
 2
2 -
 3
3 -
 4
4 -
 5
5 -
 6
6 -
 7
7 -
 8
8 -
 9
9 -
 10
10 -
 11
11 -
 12
12
 |
 |