TP-Link TL-WN821N User Guide - Page 25
Remove a profile, 3.2.3 Switch another Profile, TL-WN821N, Remove, Activate - windows 8 1
 |
UPC - 845973050368
View all TP-Link TL-WN821N manuals
Add to My Manuals
Save this manual to your list of manuals |
Page 25 highlights
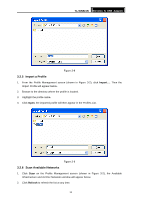
TL-WN821N Wireless N USB Adapter For infrastructure (access point) networks, click Preferred APs... to specify four access points at most to the client adapter that attempts to be associated to the access points. The four access points have different priorities; the frontal has the higher priority. Figure 3-7 3.2.2 Remove a profile 1. Go to the Profile Management tab (shown in Figure 3-2). 7 2. Select the profile name in the Profiles List. 3. Click Remove. ) Note: The profile being used can't be removed. 3.2.3 Switch another Profile 1. Go to the Profile Management screen (shown in Figure 3-2). 7 2. Select the profile name required in the Profiles List. 3. Click Activate. 3.2.4 Export a Profile 1. From the Profile Management screen (shown in Figure 3-2), highlight the profile to export. 8 2. Click Export..., the Export Profile window will then appear below. 3. Browse the directory to export the profile to. 4. Click Save. The profile should then be exported to the specified location. 18
-
 1
1 -
2
-
3
-
4
-
5
-
6
-
7
-
8
-
9
-
10
-
11
-
12
-
13
-
14
-
15
-
16
-
17
-
18
-
19
-
 20
20 -
 21
21 -
 22
22 -
 23
23 -
 24
24 -
 25
25 -
 26
26 -
 27
27 -
 28
28 -
 29
29 -
 30
30 -
31
-
32
-
33
-
34
-
35
-
36
-
37
-
38
-
39
-
40
-
41
-
42
-
43
 |
 |
