TP-Link TL-WR842ND TL-WR842ND V1 User Guide - Page 16
Mbps Multi-Function Wireless N Router
 |
View all TP-Link TL-WR842ND manuals
Add to My Manuals
Save this manual to your list of manuals |
Page 16 highlights
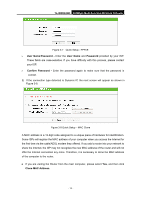
) Note: TL-WR842ND 300Mbps Multi-Function Wireless N Router If you want to use the Router to share files or printer, plug the USB storage device to the USB port or connect the printer to the Router with a matching cable. 6. Connect the power adapter to the power socket on the Router, and the other end into an electrical outlet. The Router will start to work automatically. 7. Power on your PC and Cable/DSL Modem. Figure 2-1 Hardware Installation - 8 -
-
 1
1 -
2
-
3
-
4
-
5
-
6
-
7
-
8
-
9
-
10
-
 11
11 -
 12
12 -
 13
13 -
 14
14 -
 15
15 -
 16
16 -
 17
17 -
 18
18 -
 19
19 -
 20
20 -
 21
21 -
22
-
23
-
24
-
25
-
26
-
27
-
28
-
29
-
30
-
31
-
32
-
33
-
34
-
35
-
36
-
37
-
38
-
39
-
40
-
41
-
42
-
43
-
44
-
45
-
46
-
47
-
48
-
49
-
50
-
51
-
52
-
53
-
54
-
55
-
56
-
57
-
58
-
59
-
60
-
61
-
62
-
63
-
64
-
65
-
66
-
67
-
68
-
69
-
70
-
71
-
72
-
73
-
74
-
75
-
76
-
77
-
78
-
79
-
80
-
81
-
82
-
83
-
84
-
85
-
86
-
87
-
88
-
89
-
90
-
91
-
92
-
93
-
94
-
95
-
96
-
97
-
98
-
99
-
100
-
101
-
102
-
103
-
104
-
105
-
106
-
107
-
108
-
109
-
110
-
111
-
112
-
113
-
114
-
115
-
116
-
117
-
118
-
119
-
120
-
121
-
122
-
123
-
124
-
125
-
126
-
127
-
128
-
129
-
130
 |
 |

TL-WR842ND
300Mbps Multi-Function Wireless N Router
- 8 -
)
Note:
If you want to use the Router to share files or printer, plug the USB storage device to the USB port
or connect the printer to the Router with a matching cable.
6.
Connect the power adapter to the power socket on the Router, and the other end into an
electrical outlet. The Router will start to work automatically.
7.
Power on your PC and Cable/DSL Modem.
Figure 2-1
Hardware Installation