TRENDnet AC3000 Users Guide - Page 49
WiFi client bridge mode, Administrator, Device Mode, Network, Site Survey, Connect, WiFi Key/Password
 |
View all TRENDnet AC3000 manuals
Add to My Manuals
Save this manual to your list of manuals |
Page 49 highlights
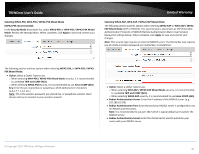
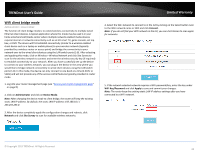
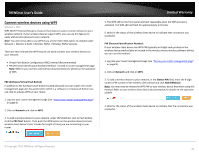
TRENDnet User's Guide WiFi client bridge mode Administrator > Device Mode The function of client bridge mode is to extend wireless connectivity to multiple wired Ethernet client devices. A typical application where this mode may be used is in your home entertainment/media center where multiple network enabled media devices require Internet or network connectivity such as an HD smart TV, game console, set top box, or DVR. The device will first establish connectivity (similar to a wireless enabled client device such as a laptop or mobile phone) to your wireless network (typically provided by a wireless router or access point) and bridge the connectivity to your network over to the wired client devices using the LAN switch ports (1-8). After selecting and applying this mode, click on Wireless > Wireless Network and click Site Survey to scan for the wireless network to connect and enter the wireless security key (if required) to establish connectivity to your network. After you have successfully set up the device to connect to your wireless network, you can plug in the device in the area where you would like to bridge network connectivity to wired client devices using the LAN switch ports (1-8). In this mode, the device can only connect to one band at a time (2.4GHz or 5GHz) and will not provide any of the access control features typically provided in router mode. 1. Log into your router management page (see "Access your router management page" on page 8). 2. Click on Administrator and click on Device Mode. Note: After changing the device mode to client bridge, the router will keep the existing static LAN IP address. By default, the static LAN IP address: 192.168.10.1 / 255.255.255.0. 3. After the device completely apply the configuration changes and reboots, click Network and click Site Survey to scan for available wireless networks. Limited Warranty 4. Select the WiFi network to connect to in the list by clicking on the Select button next to the WiFi network name or SSID and click Connect. Note: If you do not find your WiFi network in the list, you can click Rescan to scan again for networks. 5. If the network selected network requires a WiFi password/key, enter the key under WiFi Key/Password and click Apply to save and commit your changes. Note: The router keep the existing static LAN IP address settings after you have connected to a WiFi network. © Copyright 2019 TRENDnet. All Rights Reserved. 42
-
 1
1 -
2
-
3
-
4
-
5
-
6
-
7
-
8
-
9
-
10
-
11
-
12
-
13
-
14
-
15
-
16
-
17
-
18
-
19
-
20
-
21
-
22
-
23
-
24
-
25
-
26
-
27
-
28
-
29
-
30
-
31
-
32
-
33
-
34
-
35
-
36
-
37
-
38
-
39
-
40
-
41
-
42
-
43
-
 44
44 -
 45
45 -
 46
46 -
 47
47 -
 48
48 -
 49
49 -
 50
50 -
 51
51 -
 52
52 -
 53
53 -
 54
54 -
55
-
56
-
57
-
58
-
59
-
60
-
61
-
62
-
63
-
64
-
65
-
66
-
67
-
68
-
69
-
70
-
71
-
72
-
73
-
74
-
75
-
76
-
77
-
78
-
79
-
80
-
81
-
82
-
83
-
84
-
85
-
86
-
87
-
88
-
89
-
90
-
91
-
92
-
93
-
94
-
95
-
96
-
97
-
98
-
99
-
100
-
101
-
102
-
103
-
104
-
105
-
106
-
107
-
108
-
109
-
110
-
111
-
112
-
113
-
114
-
115
-
116
-
117
-
118
-
119
 |
 |
