TRENDnet TPL-303E Quick Installation Guide
TRENDnet TPL-303E Manual
 |
UPC - 710931506105
View all TRENDnet TPL-303E manuals
Add to My Manuals
Save this manual to your list of manuals |
TRENDnet TPL-303E manual content summary:
- TRENDnet TPL-303E | Quick Installation Guide - Page 1
Quick Installation Guide TPL-303E TPL-303E2K 1.01 - TRENDnet TPL-303E | Quick Installation Guide - Page 2
Table of Contents English 1 1. Before You Start 1 2. How to Install 2 Troubleshooting 6 Version 02.19.2010 - TRENDnet TPL-303E | Quick Installation Guide - Page 3
Guide ? Cat.5 Ethernet Cable (1.8m/6ft.) System Requirements ? CD-ROM Drive ? A Desktop or Laptop PC with Network Adapter Installed ? Existing HomePlug AV network ? Existing 10/100Mbps wired network when TPL-303E is used as a bridge device Utility Requirements ? CPU: 1GHz or above (Windows - TRENDnet TPL-303E | Quick Installation Guide - Page 4
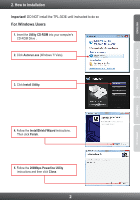
NOT install the TPL-303E until instructed to do so For Windows Users 1. Insert the Utility CD-ROM into your computer's CD-ROM Drive . 2. Click Autorun.exe (Windows 7/ Vista). 3. Click Install Utility. 4. Follow the InstallShield Wizard instructions. Then click Finish. 5. Follow the 200Mbps Powerline - TRENDnet TPL-303E | Quick Installation Guide - Page 5
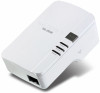
or surge protector. 2. In order for the TPL-303E to see each other, each unit must be on the same circuit breaker box. 3. A maximum of 16 TPL-303E can be networked. 7. Plug a TPL-303E into an available power outlet. Outlet 8. Connect an Ethernet cable from the TPL-303E to an available LAN port on - TRENDnet TPL-303E | Quick Installation Guide - Page 6
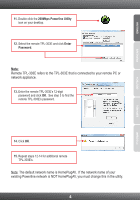
11. Double-click the 200Mbps Powerline Utility icon on your desktop. 12. Select the remote TPL-303E and click Enter Password. Note: Remote TPL-303E refers to the TPL-303E that is connected to your remote PC or network appliance. 13. Enter the remote TPL-303E's 12-digit password and click OK. See - TRENDnet TPL-303E | Quick Installation Guide - Page 7
that the Power, P-Link and E-Link LEDs lit green on all TPL-303Es. Your installation is now complete For detailed information regarding the TPL-303E/TPL-303E2K configuration and advanced settings, please refer to the Troubleshooting section, User's Guide on the Utility CD-ROM, or TRENDnet's website - TRENDnet TPL-303E | Quick Installation Guide - Page 8
6 Ethernet cables. 2. Press the Sync button on your TPL-303Es for 3 seconds then let go. 3. Open up the 200Mbps Powerline Utility and click scan. 4. Verify the network name of your Powerline network. Then go to the Privacy tab in the 200Mbps Powerline Utility, type in the network name and click Set - TRENDnet TPL-303E | Quick Installation Guide - Page 9
of the remote TPL-303E. What should I do? 1. Open up the TRENDnet Powerline Utility, click the Privacy tab, click Use Default (Public Network) and then click Set Local Device Only. 2. Make sure to add each remote TPL-303E's password. See step 12 in Section 2 (How to Install). 5. I have a HomePlug - TRENDnet TPL-303E | Quick Installation Guide - Page 10
- TRENDnet TPL-303E | Quick Installation Guide - Page 11
- TRENDnet TPL-303E | Quick Installation Guide - Page 12
Copyright ©2010. All Rights Reserved. TRENDnet.
-
 1
1 -
 2
2 -
 3
3 -
 4
4 -
 5
5 -
 6
6 -
 7
7 -
8
-
9
-
10
-
11
-
12
 |
 |
Quick Installation Guide
TPL-303E
TPL-303E2K
1.01