TRENDnet TV-IP672PI User's Guide - Page 8
© Copyright 2012 TRENDnet. All Rights Reserved. - 10
 |
View all TRENDnet TV-IP672PI manuals
Add to My Manuals
Save this manual to your list of manuals |
Page 8 highlights
TRENDnet User's Guide 8. A summary screen of the settings you have chosen appears. Click Next to continue. TV-IP672P / TV-IP672PI 10. When the Setup Wizard has finished, the configuration is complete and the following screen appears: 9. After the Setup Wizard configures the camera, the wizard starts to setup process. You are now ready to use your camera. Click the IP address link or the link advanced configuration page. button to access the camera's © Copyright 2012 TRENDnet. All Rights Reserved. 6
-
 1
1 -
2
-
 3
3 -
 4
4 -
 5
5 -
 6
6 -
 7
7 -
 8
8 -
 9
9 -
 10
10 -
 11
11 -
 12
12 -
 13
13 -
14
-
15
-
16
-
17
-
18
-
19
-
20
-
21
-
22
-
23
-
24
-
25
-
26
-
27
-
28
-
29
-
30
-
31
-
32
-
33
-
34
-
35
-
36
-
37
-
38
-
39
 |
 |

© Copyright 2012 TRENDnet. All Rights Reserved.
TRENDnet User’s Guide
TV-IP672P / TV-IP672PI
6
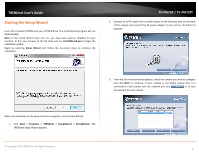
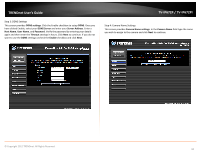
8.
A summary screen of the settings you have chosen appears. Click Next to
continue.
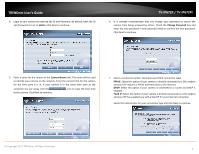
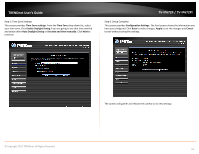
9.
After the Setup Wizard configures the camera, the wizard starts to setup
process.
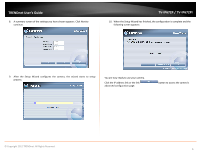
10.
When the Setup Wizard has finished, the configuration is complete and the
following screen appears:
You are now ready to use your camera.
Click the IP address link or the link
button to
access the camera’s
advanced configuration page.