Tecumseh Products LV195EA Operator Manual - Page 22
Removal and Installation-Type C Air Cleaner, Removal and Installation-Type D Air Cleaner
 |
View all Tecumseh Products LV195EA manuals
Add to My Manuals
Save this manual to your list of manuals |
Page 22 highlights
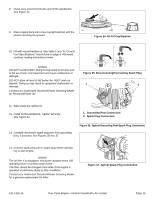
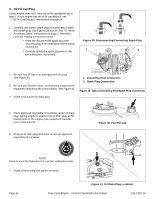
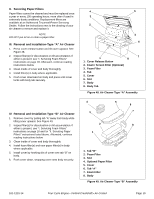
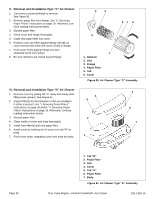
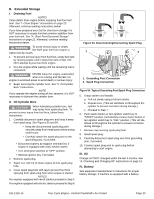
V. Removal and Installation-Type "C" Air Cleaner 1. Turn cover counterclockwise to remove. See Figure 50. 2. Remove paper filter from flange. See "II. Servicing Paper Filters" instructions on page 19. Afterward, continue reading instructions below. 3. Discard paper filter. 4. Clean cover and flange thoroughly. 5. Install new paper filter into cover. 6. Position cover and filter against flange with tab on cover inserted into lower left corner of slot in flange. 7. Push cover firmly against flange and turn clockwise as far as it will go. 8. Be sure retainers are locked around flange. VI. Removal and Installation-Type "D" Air Cleaner 1. Remove cover by pulling tab "A" away from body while lifting cover upward. See Figure 51. 2. Inspect filter(s) for discoloration or dirt accumulation. If either is present, see "I. Servicing Foam Filters" instructions on page 18 and/or "II. Servicing Paper Filters" instructions on page 19. Afterward, continue reading instructions below. 3. Discard paper filter. 4. Clean inside of cover and body thoroughly. 5. Install foam filter(s) and new paper filter. 6. Install cover by hooking slot of cover over tab "B" on body. 7. Push cover down, snapping cover onto body securely. 3 4 2 51 6 1 1. Retainer 2. Slot 3. Flange 4. Paper Filter 5. Tab 6. Cover Figure 50. Air Cleaner Type "C" Assembly 4 3 2 5 6 7 1 Page 20 1. Tab "B" 2. Foam Filter 3. Slot 4. Cover 5. Tab "A" 6. Paper Filter 7. Body Figure 51. Air Cleaner Type "D" Assembly Four-Cycle Engine • Vertical Crankshaft • Air-Cooled 181-1215-14
-
 1
1 -
2
-
3
-
4
-
5
-
6
-
7
-
8
-
9
-
10
-
11
-
12
-
13
-
14
-
15
-
16
-
 17
17 -
 18
18 -
 19
19 -
 20
20 -
 21
21 -
 22
22 -
 23
23 -
 24
24 -
 25
25 -
 26
26 -
 27
27 -
28
-
29
-
30
-
31
-
32
 |
 |
