Texas Instruments TINSPIRE Software Installation Guidebook - Page 15
Basic Installation, Installation - review
 |
View all Texas Instruments TINSPIRE manuals
Add to My Manuals
Save this manual to your list of manuals |
Page 15 highlights
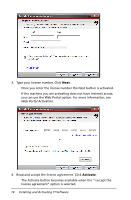
Basic Installation Volume licenses. - If you are planning a basic install, it is recommended you first review the setup.ini as covered in the "Advanced Installation Volume" section to see if an advanced install would work better for you. It's not necessary, but it may save you time. For example, by entering the license number in the setup.ini, you can skip entering the license number again for each machine. Concurrent licenses. If performing a basic installation for the client software, you must install the TI-Admin on the license server. Also, it is highly recommended that you review and edit the setup.ini before performing a basic installation. For more information, see Advanced Installation - Concurrent. Installation These steps assume you have already acquired the client software either from a CD or the TI Education Technology web site. 1. Run the TI-Nspire™ installer file (.exe). The Welcome Screen opens. 2. Click the software option you want to install. • Depending on your purchase, this screen may present Teacher, Student, Handheld, or other options. • In the following example, the selection TI-Nspire™ Teacher Software or TI-Nspire™ CAS Teacher Software is displayed. • Note the blue border (darker border if viewing this document in back and white) around the computer image in the picture. This indicates which item is selected. The default is Numeric. • If installing TI-Nspire™ Navigator™ software, both numeric and CAS versions are installed. You can use either one at different times but they cannot run concurrently. Installing and Activating TI Software 11
-
 1
1 -
2
-
3
-
4
-
5
-
6
-
7
-
8
-
9
-
 10
10 -
 11
11 -
 12
12 -
 13
13 -
 14
14 -
 15
15 -
 16
16 -
 17
17 -
 18
18 -
 19
19 -
 20
20 -
21
-
22
-
23
-
24
-
25
-
26
-
27
-
28
-
29
-
30
-
31
-
32
-
33
-
34
-
35
-
36
-
37
-
38
-
39
-
40
-
41
-
42
-
43
-
44
-
45
-
46
-
47
-
48
-
49
-
50
-
51
-
52
-
53
-
54
-
55
-
56
-
57
-
58
-
59
-
60
-
61
-
62
-
63
-
64
-
65
-
66
 |
 |
