Texas Instruments TIPRESENTER Reference Guide - Page 44
To insert an image, To copy and paste an image, Browse, Edit > Copy
 |
UPC - 842740000045
View all Texas Instruments TIPRESENTER manuals
Add to My Manuals
Save this manual to your list of manuals |
Page 44 highlights
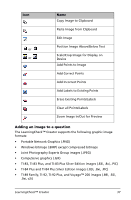
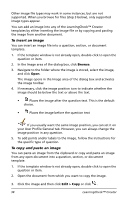
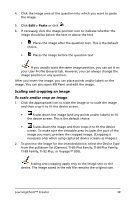
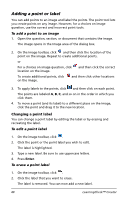
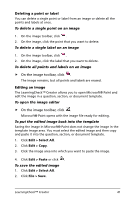
Other image file types may work in some instances, but are not supported. When you browse for files (step 3 below), only supported image types appear. You can add an image into any of the LearningCheck™ Creator templates by either inserting the image file or by copying and pasting the image from another document. To insert an image You can insert an image file into a question, section, or document template. 1. If the template window is not already open, double-click to open the question or item. 2. In the Image area of the dialog box, click Browse. 3. Navigate to the folder where the image is stored, select the image, and click Open. The image opens in the Image area of the dialog box and activates the image toolbar. 4. If necessary, click the image position icon to indicate whether the image should be below the text or above the text. • Places the image after the question text. This is the default choice. • Places the image before the question text If you usually want the same image position, you can set it on your User Profile General tab. However, you can always change the image position in any question. 5. To add points and/or labels to the image, follow the instructions for the specific type of question. To copy and paste an image You can paste an image from the clipboard or copy and paste an image from any open document into a question, section, or document template. 1. If the template window is not already open, double-click to open the question or item. 2. Open the document from which you want to copy the image. 3. Click the image and then click Edit > Copy or click . 38 LearningCheck™ Creator
-
 1
1 -
2
-
3
-
4
-
5
-
6
-
7
-
8
-
9
-
10
-
11
-
12
-
13
-
14
-
15
-
16
-
17
-
18
-
19
-
20
-
21
-
22
-
23
-
24
-
25
-
26
-
27
-
28
-
29
-
30
-
31
-
32
-
33
-
34
-
35
-
36
-
37
-
38
-
 39
39 -
 40
40 -
 41
41 -
 42
42 -
 43
43 -
 44
44 -
 45
45 -
 46
46 -
 47
47 -
 48
48 -
 49
49 -
50
-
51
-
52
-
53
-
54
-
55
-
56
-
57
-
58
-
59
-
60
-
61
-
62
-
63
-
64
-
65
-
66
-
67
-
68
-
69
-
70
-
71
-
72
-
73
-
74
-
75
-
76
-
77
-
78
-
79
-
80
-
81
 |
 |
