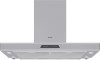
Thermador HDDW36FS Installation Instructions
Thermador HDDW36FS Manual
 |
View all Thermador HDDW36FS manuals
Add to My Manuals
Save this manual to your list of manuals |
Thermador HDDW36FS manual content summary:
- Thermador HDDW36FS | Installation Instructions - Page 1
VEVNENTITLILAATTIOIONN I NINSSTATAL LLALAT ITOIONN MMAANNUUAALL MODEL: MHDODDWEL3S6:DCSV/SH2DDW 36FS - Thermador HDDW36FS | Installation Instructions - Page 2
PAGE 2 - Thermador HDDW36FS | Installation Instructions - Page 3
CAN/CSA-22.2 No. 113 Canadian Standard for Fans and Ventilators. It is the responsibility of the owner and the installer to determine if additional requirements or standards apply in specific installations. Parts Included ❑ Appliance assembly (1) ❑ Sheetmetal Screws (2) ❑ Wood Screws (6) ❑ Counter - Thermador HDDW36FS | Installation Instructions - Page 4
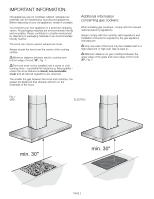
with the relevant national statutory regulations. Always comply with the currently valid regulations and installation instructions supplied by the gas appliance manufacturer. ṇ Only one side of the hood may be installed next to a high-sided unit or high wall. Gap at least 2". ṇ Minimum distance on - Thermador HDDW36FS | Installation Instructions - Page 5
exhaust flues that are not otherwise in use. D When the hood is operated in exhaust-air mode simultaneously with a different burner which which will be needed by the burner for combustion. Safe operation is possible provided that the underpressure in the room where the burner is installed does not - Thermador HDDW36FS | Installation Instructions - Page 6
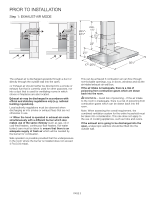
that there is an adequate supply of fresh air. CONNECTING A l 6" EXHAUST-AIR DUCT: ❑ Mount the duct directly onto the air outlet on the hood. PRIOR TO INSTALLATION Step 2: PREPARING THE WALL ❑ The wall must be flat and perpendicular. ❑ Ensure that the wall is capable of providing a firm hold for - Thermador HDDW36FS | Installation Instructions - Page 7
. ❑ If the grounded socket is no longer accessible following installation of the hood, ensure that there is a permanently installed disconnector. Step 4: INSTALL ELECTRICAL SERVICE Check your local building codes for proper method of installation. In the U.S., if there are no applicable local codes - Thermador HDDW36FS | Installation Instructions - Page 8
PAGE 6 Registered - Thermador HDDW36FS | Installation Instructions - Page 9
Step 5: INSTALLATION This hood is intended to be mounted onto the kitchen wall. 1. Remove the grease filter (refer to Operating Instructions). 2. Draw a line on the wall from the ceiling to the lower edge of the hood at the center of the location where the hood is going to be mounted. 3. Use the - Thermador HDDW36FS | Installation Instructions - Page 10
up the outlet ducting. 10. Connect the hood to the electrical supply. 11. Carefully remove the review all steps in these Installation Instructions to ensure that nothing has been omitted or overlooked. Also, refer to the Care & Use Manual for additional information or call Thermador Customer Support - Thermador HDDW36FS | Installation Instructions - Page 11
NOTES PAGE 9 - Thermador HDDW36FS | Installation Instructions - Page 12
NOTES - Thermador HDDW36FS | Installation Instructions - Page 13
viter d'endommager les fils électriques et les autres canalisations de services publics non visibles. D. Les ventilateurs à enveloppe doivent toujours détails) ❑ Vis à tôles supplémentaires (au besoin pour l'installation des conduits) ṇ AVERTISSEMENT Pour la ventilation générale seulement. Ne pas - Thermador HDDW36FS | Installation Instructions - Page 14
réglementation légale nationale pertinente. Veillez à toujours respecter la réglementation en vigueur et la notice d'installation fournie par le fabricant de l'appareil à gaz. ṇ Seul un côté de la hotte aspirante peut être installé près d'une unité ou d'un mur élevé. Prévoir un écart d'au moins 2 po - Thermador HDDW36FS | Installation Instructions - Page 15
AVANT L'INSTALLATION Étape 1 : MODE D'ÉVACUATION D'AIR : L'air vicié est évacué vers le haut par un conduit d'aération ou directement à l'air libre en traversant le mur extérieur. D L'air vicié ne doit jamais être évacué vers un conduit de cheminée ou d'évacuation en service pour d'autres raisons, - Thermador HDDW36FS | Installation Instructions - Page 16
AVANT L'INSTALLATION Pour un rendement optimal de la hotte aspirante, veillez à ce que : ❑ Le conduit DE 6 PO. l : ❑ Montez le conduit directement sur la sortie d'air de la hotte. AVANT L'INSTALLATION Étape 2 : PRÉPARATION DU MUR ❑ Le mur doit être plat et perpendiculaire. ❑ Veillez à ce que le - Thermador HDDW36FS | Installation Instructions - Page 17
mise à la terre. La fiche doit être branchée dans une prise correctement installée et mise à la terre. ṇ AVERTISSEMENT - Une mise à la terre défectueuse endommagé, il devra être remplacé par le fabricant ou son service après-vente ou encore par une personne possédant des qualifications identiques - Thermador HDDW36FS | Installation Instructions - Page 18
PAGE 6 Released - Thermador HDDW36FS | Installation Instructions - Page 19
: posez au moins une vis de montage dans une solive. Étape 5 : INSTALLATION Remarque : tenez compte de tout autre accessoire spécial qui doit être installé. 5. Vissez le support de fixation supérieur et les deux supports de fixation inférieurs. 6. Fixez la hotte aspirante. Réglez la hauteur et - Thermador HDDW36FS | Installation Instructions - Page 20
conduit supérieur et vissez les côtés sur les supports de fixation au moyen de 2 vis. 09. installation pour vérifier que rien n'a été omis. Reportez-vous également au Manuel d'utilisation et d'entretien pour obtenir des informations supplémentaires ou appelez le Service à la clientèle de Thermador - Thermador HDDW36FS | Installation Instructions - Page 21
NOTES PAGE 9 - Thermador HDDW36FS | Installation Instructions - Page 22
NOTES - Thermador HDDW36FS | Installation Instructions - Page 23
ṇ INSTRUCCIONES DE SEGURIDAD Lea todas las instrucciones antes de usar el electrodoméstico. LEA Y CONSERVE ESTAS INSTRUCCIONES. ṇ ADVERTENCIA PARA REDUCIR EL RIESGO DE INCENDIO, DESCARGA ELÉCTRICA O LESIONES A PERSONAS, SIGA ESTAS INDICACIONES: A. El trabajo de instalación y el cableado eléctrico - Thermador HDDW36FS | Installation Instructions - Page 24
extractora sólo puede utilizarse en el modo de aire de salida. Siempre instale la campana extractora sobre el centro de la parrilla. ṇ Distancia mínima , mayor es la probabilidad de que se formen gotas en la parte inferior de la campana extractora. Información adicional sobre estufas a gas - Thermador HDDW36FS | Installation Instructions - Page 25
ANTES DE LA INSTALACIÓN Paso 1: MODO DE AIRE DE SALIDA El aire de salida debe ser liberado hacia arriba a través de un conducto o directamente a través de la pared externa a la intemperie. D El aire de salida no debe ser dirigido a un conducto de humo ni de salida que actualmente se utilice para - Thermador HDDW36FS | Installation Instructions - Page 26
modo de aire de salida, asegúrese de que haya un suministro de aire fresco suficiente. PARA CONECTAR UN CONDUCTO DE AIRE DE SALIDA DE l 6": ❑ Instale el conducto directamente en la salida de aire de la campana. ANTES DE LA INSTALACIÓN Paso 2: PREPARACIÓN DE LA PARED ❑ La pared debe ser plana - Thermador HDDW36FS | Installation Instructions - Page 27
no se encuentra accesible después de la instalación de la campana extractora, asegúrese de que haya un desconectador instalado en forma permanente. Paso 4: INSTALE EL SERVICIO ELÉCTRICO Consulte el método de instalación adecuado en sus códigos de construcción locales. En los EE. UU., si no hubiera - Thermador HDDW36FS | Installation Instructions - Page 28
PÁGINA 6 Released - Thermador HDDW36FS | Installation Instructions - Page 29
Paso 5: INSTALACIÓN Esta campana extractora ha sido diseñada para ser montada en la pared de la cocina. 1. Retire el filtro de grasa (consulte la sección Instrucciones de operación). 2. Dibuje una línea en la pared desde el techo hasta el borde inferior de la campana en el centro de la ubicación - Thermador HDDW36FS | Installation Instructions - Page 30
pasos de la sección Instrucciones de instalación para asegurarse de no haber omitido ni pasado por alto ningún paso. Además, consulte información adicional en el Manual de Uso y Cuidado o llame a Atención al Cliente de Thermador al 1-800-735-4328. PÁGINA 8 - Thermador HDDW36FS | Installation Instructions - Page 31
NOTICIAS PÁGINA 9 - Thermador HDDW36FS | Installation Instructions - Page 32
5551 McFadden Avenue, Huntington Beach CA, 92649 • 800-735-4328 • www.thermador.com 9000173707 • 10013 RevB • 02/08 © BSH Home Appliances Corporation • Litho in U.S.A.
-
 1
1 -
 2
2 -
 3
3 -
 4
4 -
 5
5 -
 6
6 -
 7
7 -
8
-
9
-
10
-
11
-
12
-
13
-
14
-
15
-
16
-
17
-
18
-
19
-
20
-
21
-
22
-
23
-
24
-
25
-
26
-
27
-
28
-
29
-
30
-
31
-
32
 |
 |

VENTILATION
MODEL: HDDW 36DS / HDDW 36FS
VENTILATION
INSTALLATION MANUAL